
Elytra
User guide for the Elytra fully wireless split ergonomic keyboard — unboxing, pairing, Vial remapping, the tenting kit, firmware updates and troubleshooting.
Welcome to the Elytra split keyboard. This guide takes you from initial pairing all the way to mastering custom configurations and advanced features.
Part 1: Unboxing & Quick Start
This section helps you complete the basic setup and get typing in just a few minutes.
What's in the Box
The Elytra packaging uses a two-layer tray — each layer holds one keyboard half — with an accessory box on the side. Be sure to check both layers and the side compartment when unboxing.
- Two tray layers: one keyboard half per layer — the left (Central) and right (Peripheral) halves.
- Accessory box (side): the USB-C cable, extra switches, replacement keycaps, the tenting kit (sold separately) and a welcome card.
Powering On & Off
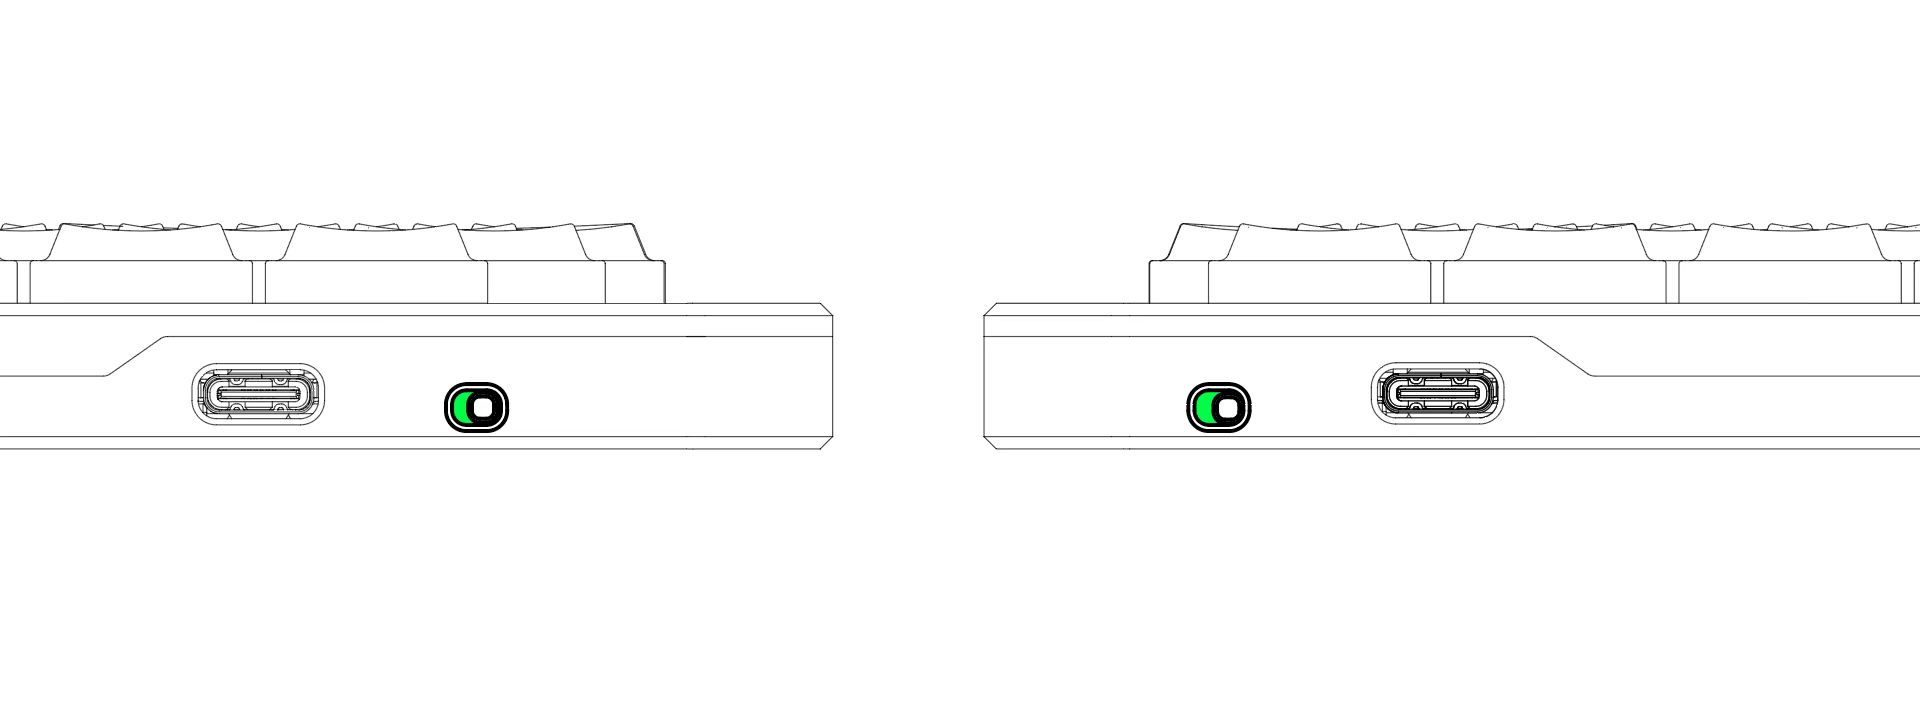
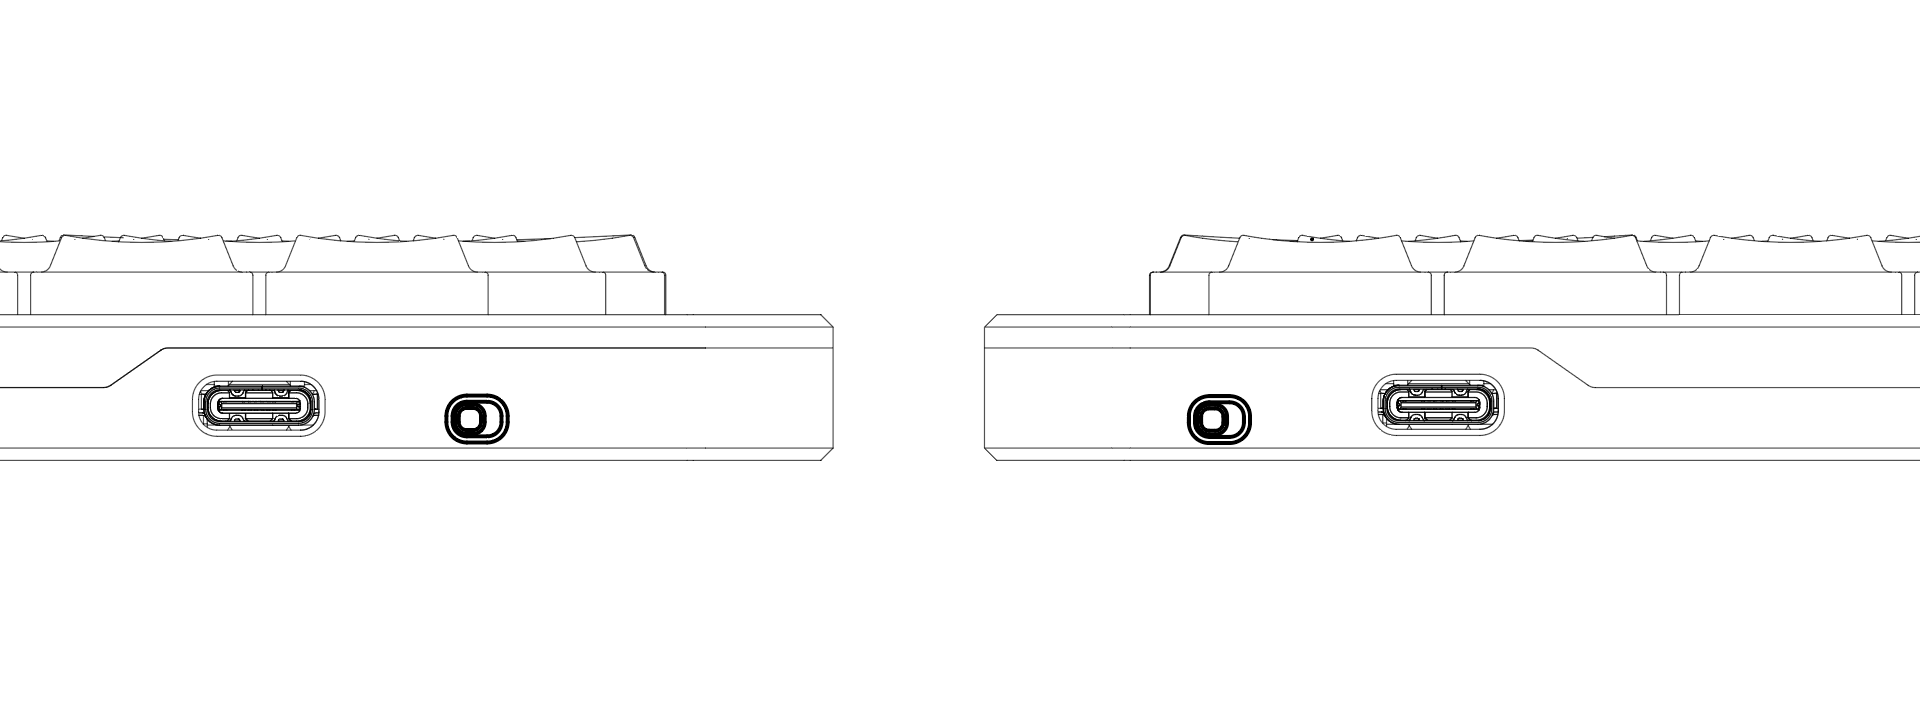
The power switches are located on the inner edge of each keyboard half, near the USB-C port.
- Power On: Slide the switch to the right (when facing the switch).
- Power Off: Slide the switch to the left (when facing the switch).
Getting Connected
Your Elytra arrives pre-paired from the factory. In most cases you simply connect the left (Central) half to your computer via USB or Bluetooth and start typing right away.
Quick Tip: If the right half's indicator flashes blue when you first turn it on, don't worry — this is normal. The two halves are syncing. Just wait about 10 seconds for them to connect automatically.
Wired Mode (Recommended for First-Time Use)
- Connect the left (Central) half to your computer using the included USB-C cable.
- The USB-C port on the right (Peripheral) half is for charging only and cannot transmit data.
Bluetooth Mode
Elytra supports Bluetooth 5.0 and above.
- Make sure the power switches on both halves are turned on.
- Open your device's Bluetooth menu, search for "Elytra", and connect.
Read before wireless pairing. Most wireless issues — undiscoverable devices, pairing failures or intermittent drops — are caused by outdated Bluetooth or network adapter drivers on the computer.
Before pairing, visit your computer/motherboard manufacturer's website (or chip makers such as Intel/Realtek) and update your Bluetooth drivers to the latest stable version. Default OS drivers often struggle to fully support modern Bluetooth Low Energy (BLE) split devices.
Intel driver download: Intel® Wireless Bluetooth® Drivers for Windows 10 and 11
First-Time Setup on macOS
The first time you connect the Elytra to a Mac, macOS launches the Keyboard Setup Assistant to identify the keyboard's layout. This is a normal, one-time step that appears for any keyboard macOS hasn't seen before — simply follow the on-screen prompts:
-
When asked to press the key immediately to the right of the left Shift key, press
Z. -
When asked to press the key immediately to the left of the right Shift key, press the
?/key.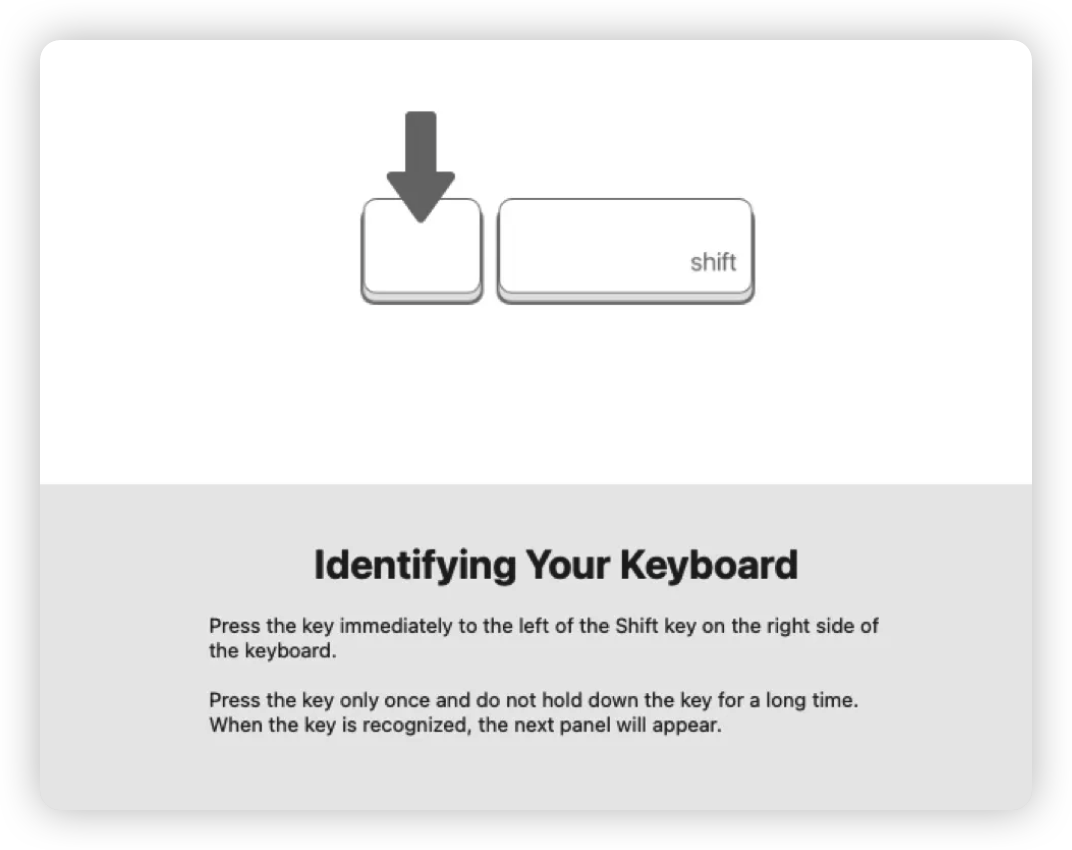
macOS then identifies the Elytra as a standard ANSI keyboard and closes the assistant. Your keyboard is ready to use.
If macOS still can't identify the keyboard, the assistant will ask you to choose a layout manually. Select ANSI — that's the layout the Elytra uses.
Charging the Keyboard
Each half has its own battery and charges through its USB-C port.
- Connect the keyboard to your PC with the USB-C (Type-C) cable to charge. While charging, the left indicator light breathes green; once fully charged, it turns solid green and then goes off.
- The left and right halves can be charged separately. The right (Peripheral) half generally lasts much longer on a single charge than the left (Central) half, so there's no need to charge both at the same time.
Do not use a fast charger. The keyboard accepts only 5V/1A input. Charging from a computer's USB port is recommended.
Understanding the Indicator Lights
Each keyboard half has two indicator lights. On both halves, the left light shows battery & charging status and the right light shows connection status.
Left Keyboard (Central)
| Light | Color | Behavior | Meaning |
|---|---|---|---|
| Left(Outer) light | 🟢 Green | Breathing / Solid | Charging / Fully charged |
| Left(Outer) light | 🔴 Red | Flashing | Low battery — please plug in to charge |
| Left(Outer) light | 🔵 Blue | Slow flashing | Searching for the right (Peripheral) half |
| Right(Inner) light | 🔵 / 🟢 / 🔴 | Fast flashing | Bluetooth pairing mode (discoverable). Color = BT profile |
| Right(Inner) light | — | Solid briefly → Off | Connected to your computer |
Right Keyboard (Peripheral)
| Light | Color | Behavior | Meaning |
|---|---|---|---|
| Left(Inner) light | 🟢 Green | Breathing / Solid | Charging / Fully charged |
| Left(Inner) light | 🔴 Red | Flashing | Low battery — please plug in to charge |
| Right(Outer) light | 🔵 Blue | Slow flashing | Searching for the left (Central) half |
| Right(Outer) light | 🔵 Blue | Solid briefly → Off | Connected to the left half |
Part 2: Customization & Advanced Features
Remapping Keys with Vial
Elytra lets you customize your keymap directly in your web browser — no software installation required. Changes take effect instantly.
Linux users: Linux requires a udev rule granting your browser access to the keyboard — without it, Vial cannot detect the device. Follow the official guide — Vial: udev rules on Linux — then unplug and replug the keyboard before connecting.
-
Connect the left half to your computer via USB.
-
Open a Chromium-based browser (Chrome or Edge) and visit vial.rocks.

-
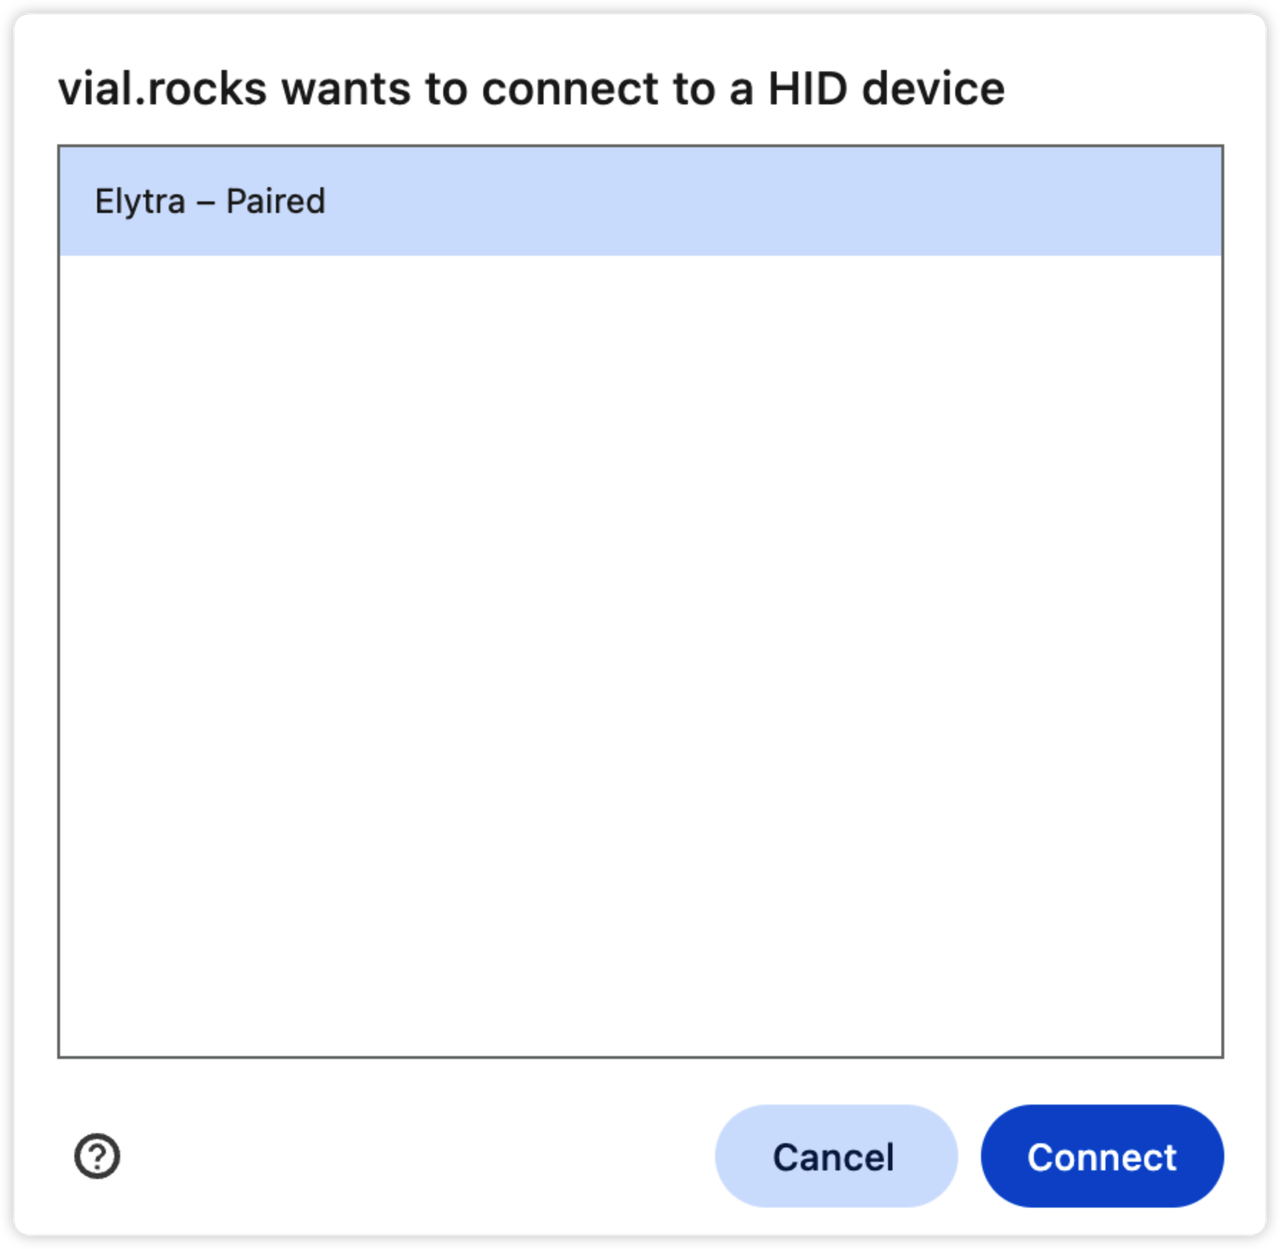
Click Start Vial, select Elytra from the pop-up window, and click Connect.
-
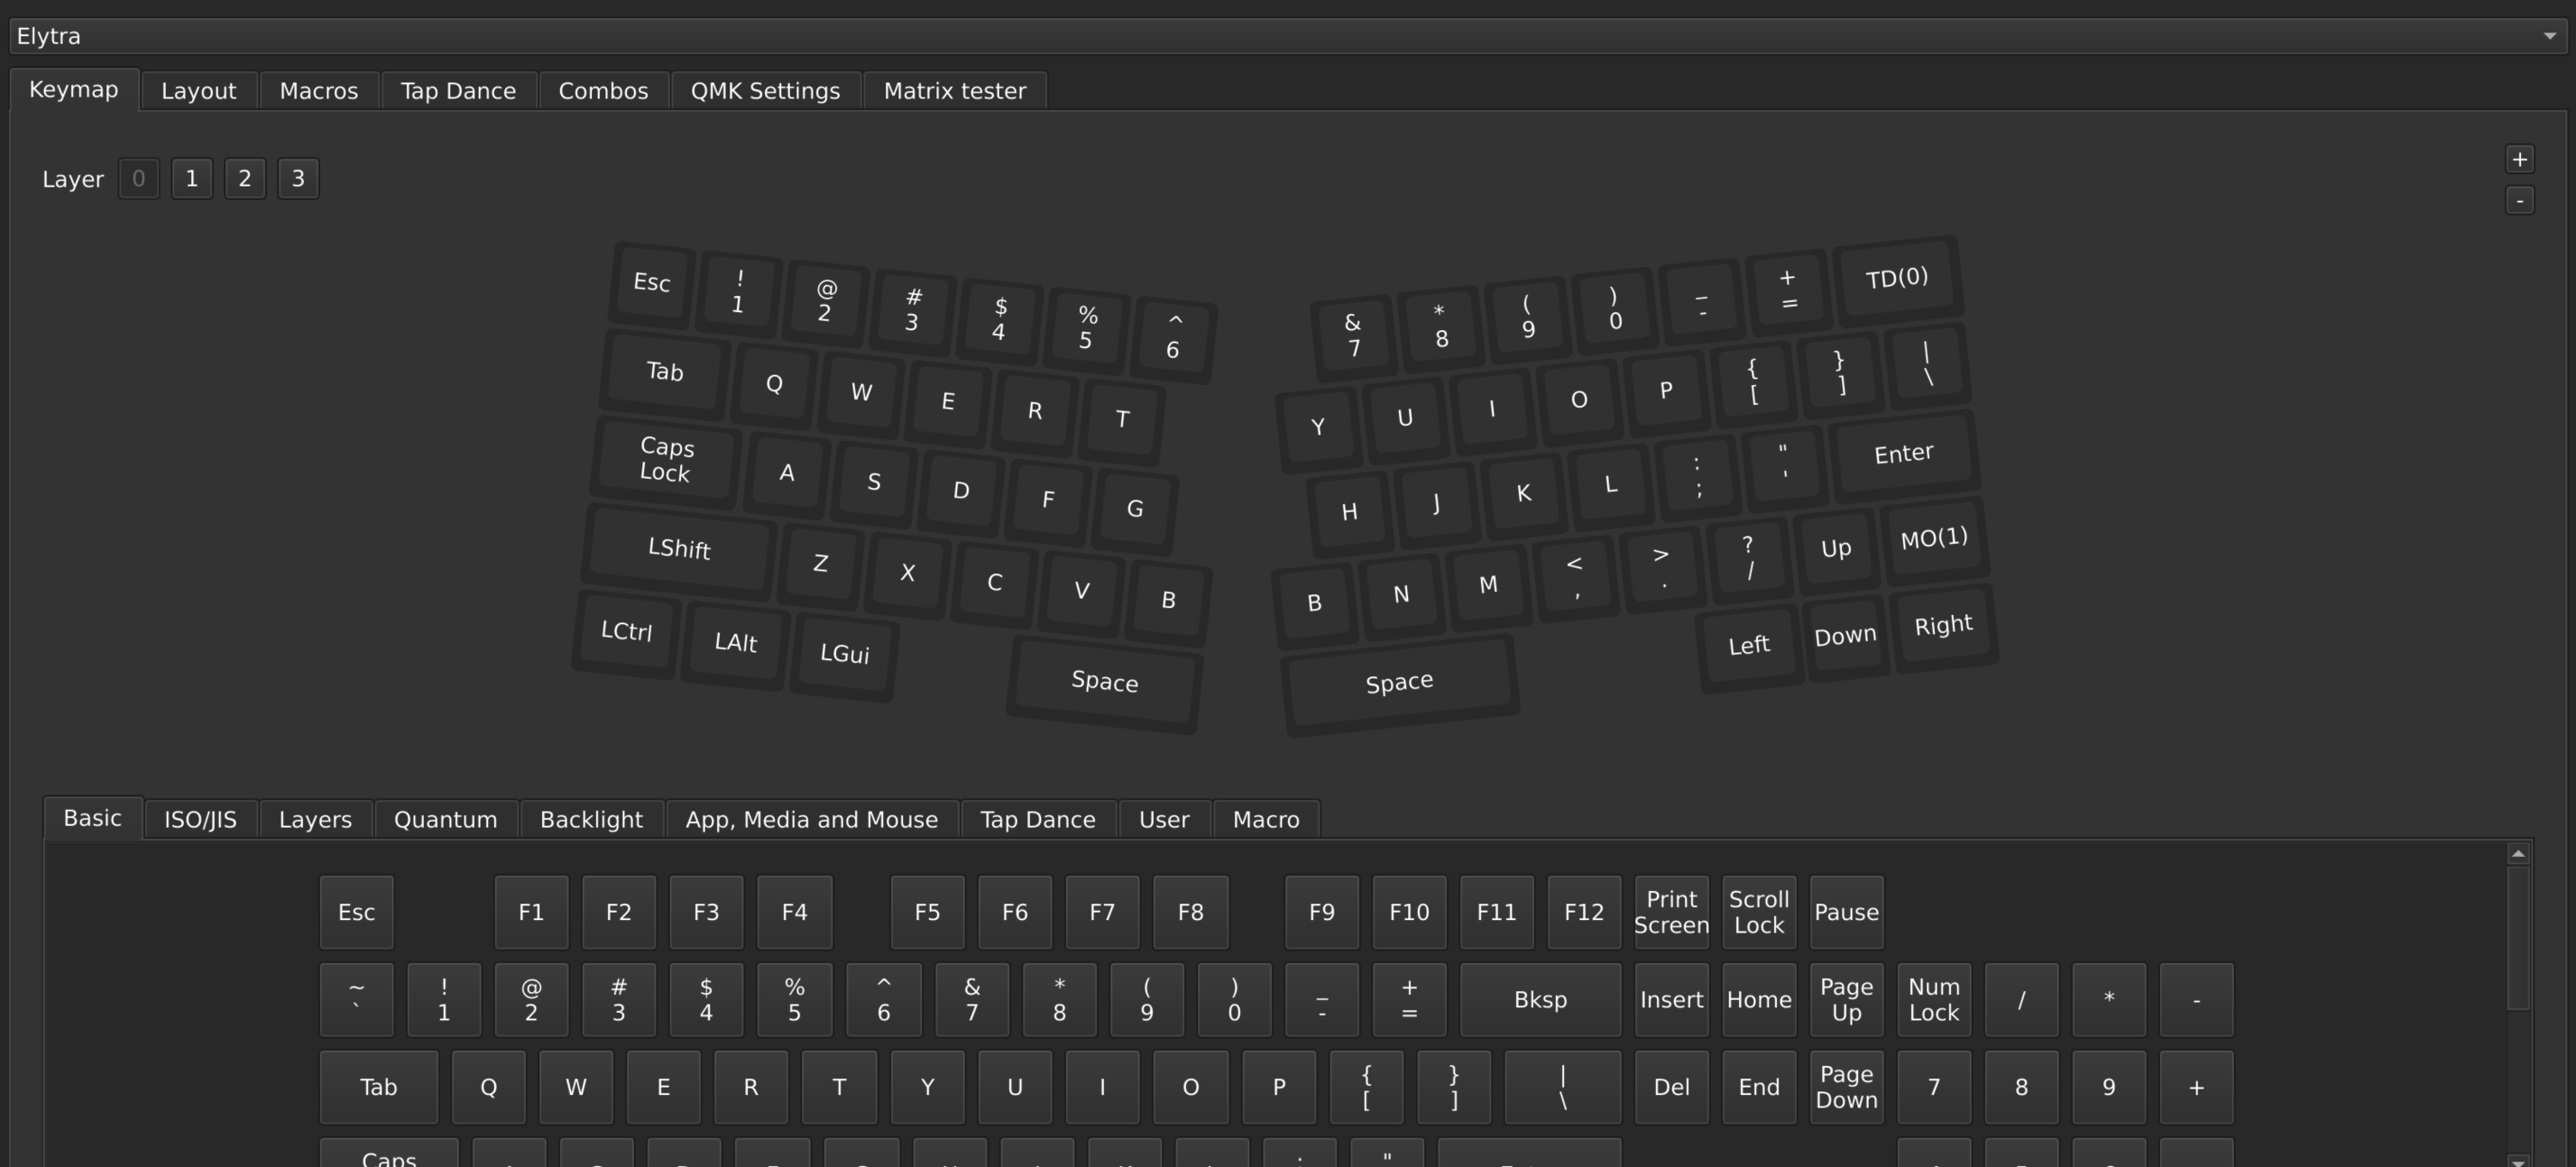
You'll now see your keymap interface. Click any key on screen to reassign it across multiple layers. Changes are saved automatically and immediately.
-
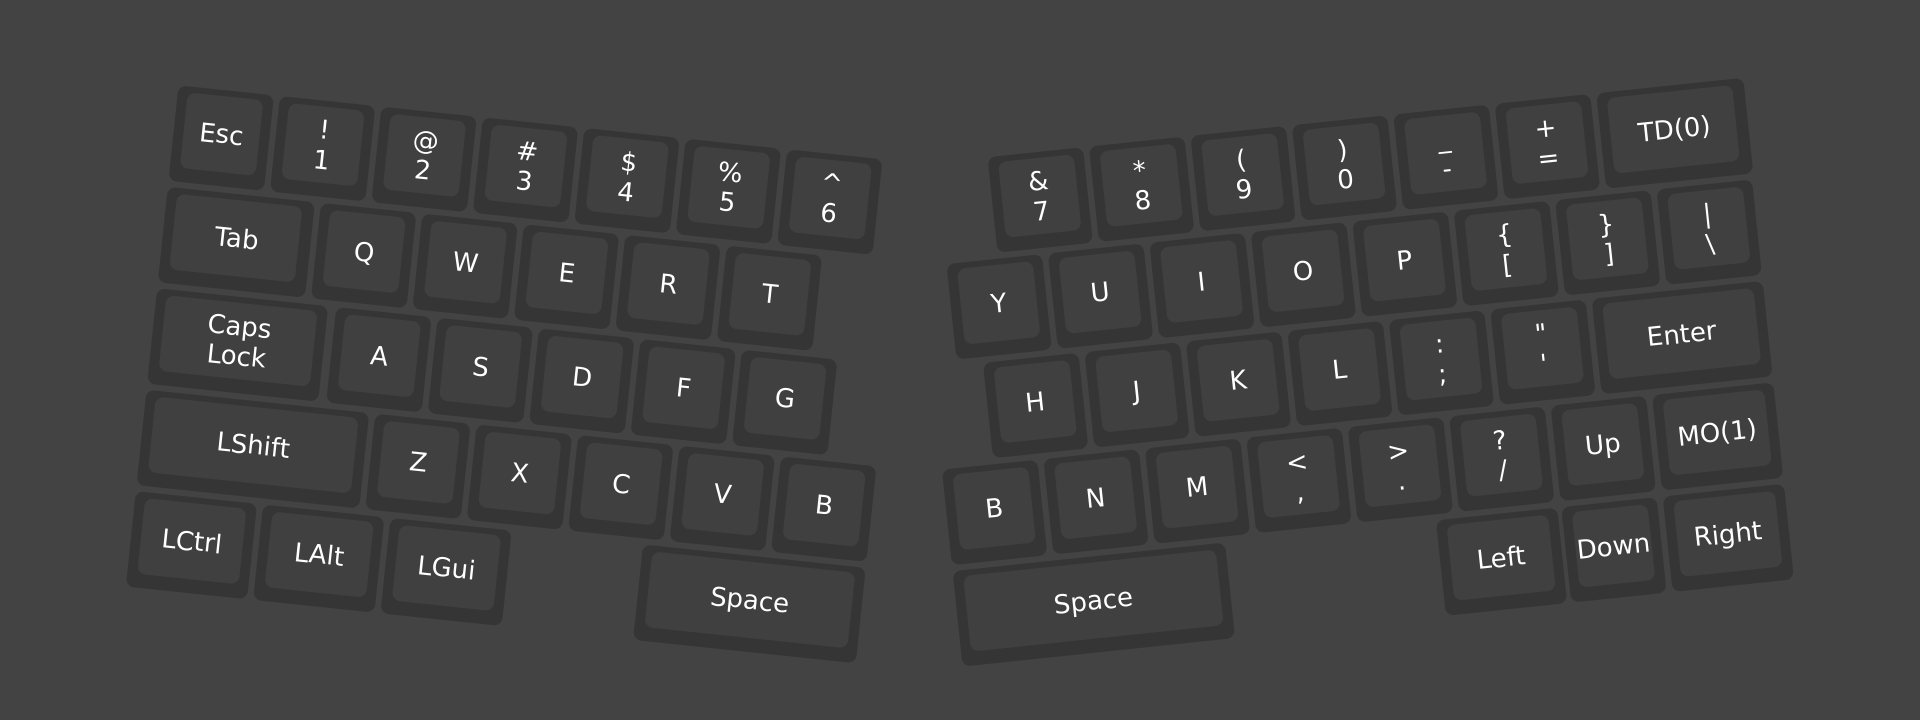
Default layouts:
-
Layer 0 (base layer):
-
Layer 1 (hold
Fnto access):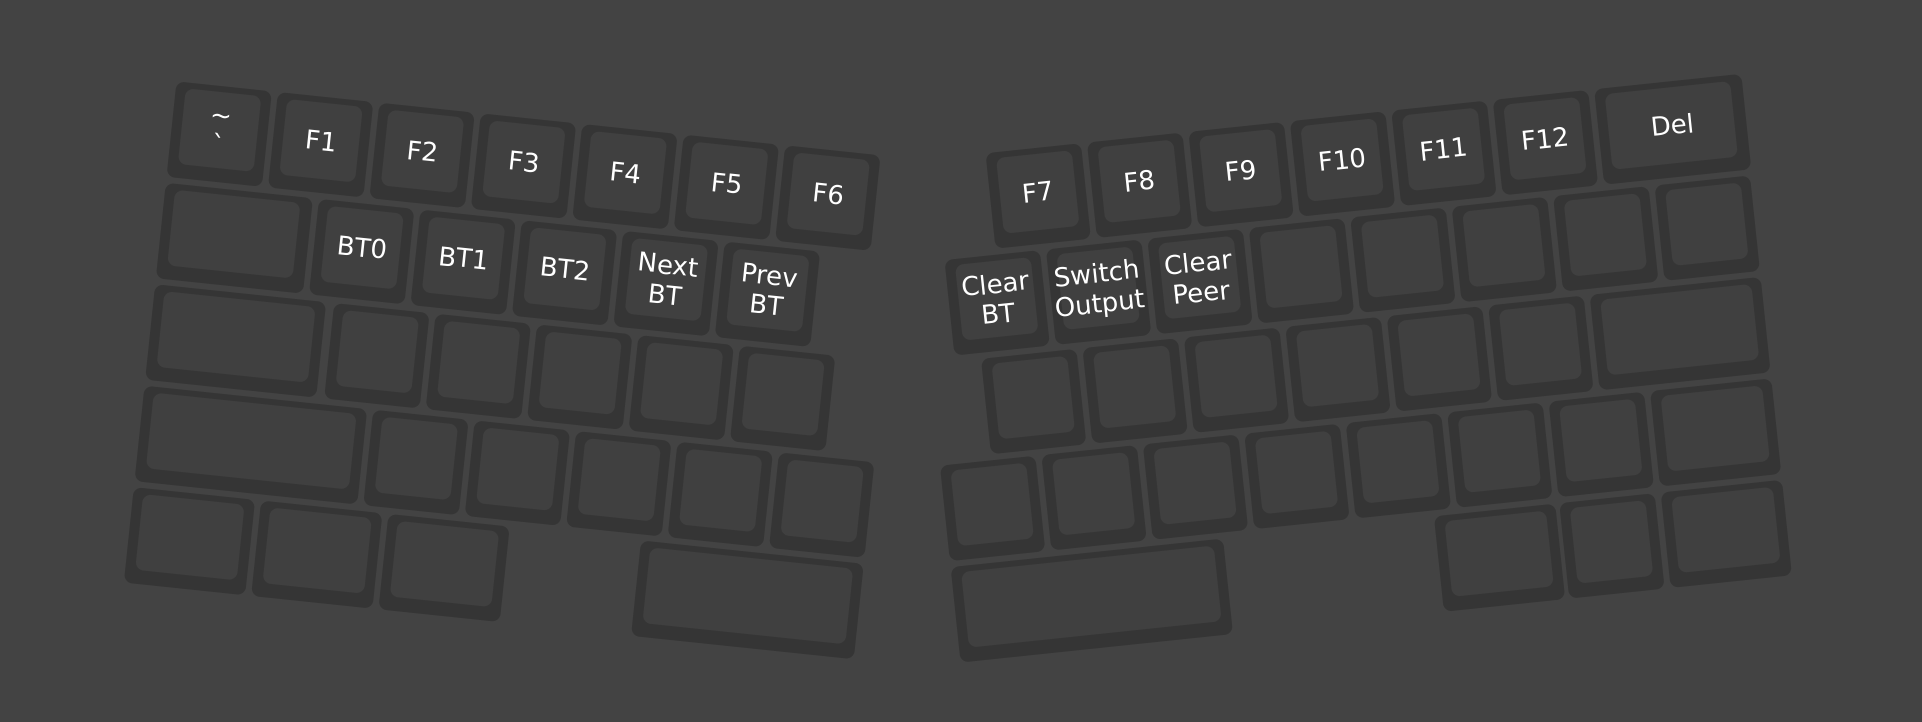
-
Connection may occasionally fail due to signal interference. If this happens, refresh the page and retry.
Bluetooth Multi-Device Switching & Output Modes
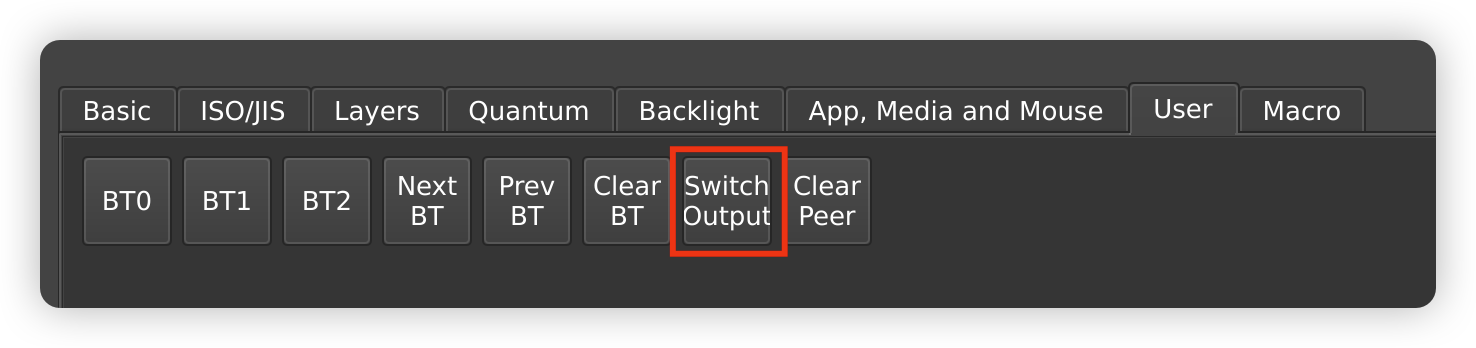
Multi-device switching. Elytra can connect to multiple devices. In Vial's User tab,
assign keys to BT0, BT1, and BT2 to seamlessly switch between your PC, tablet, and phone.
By default these live on Layer 1 (hold Fn to access):
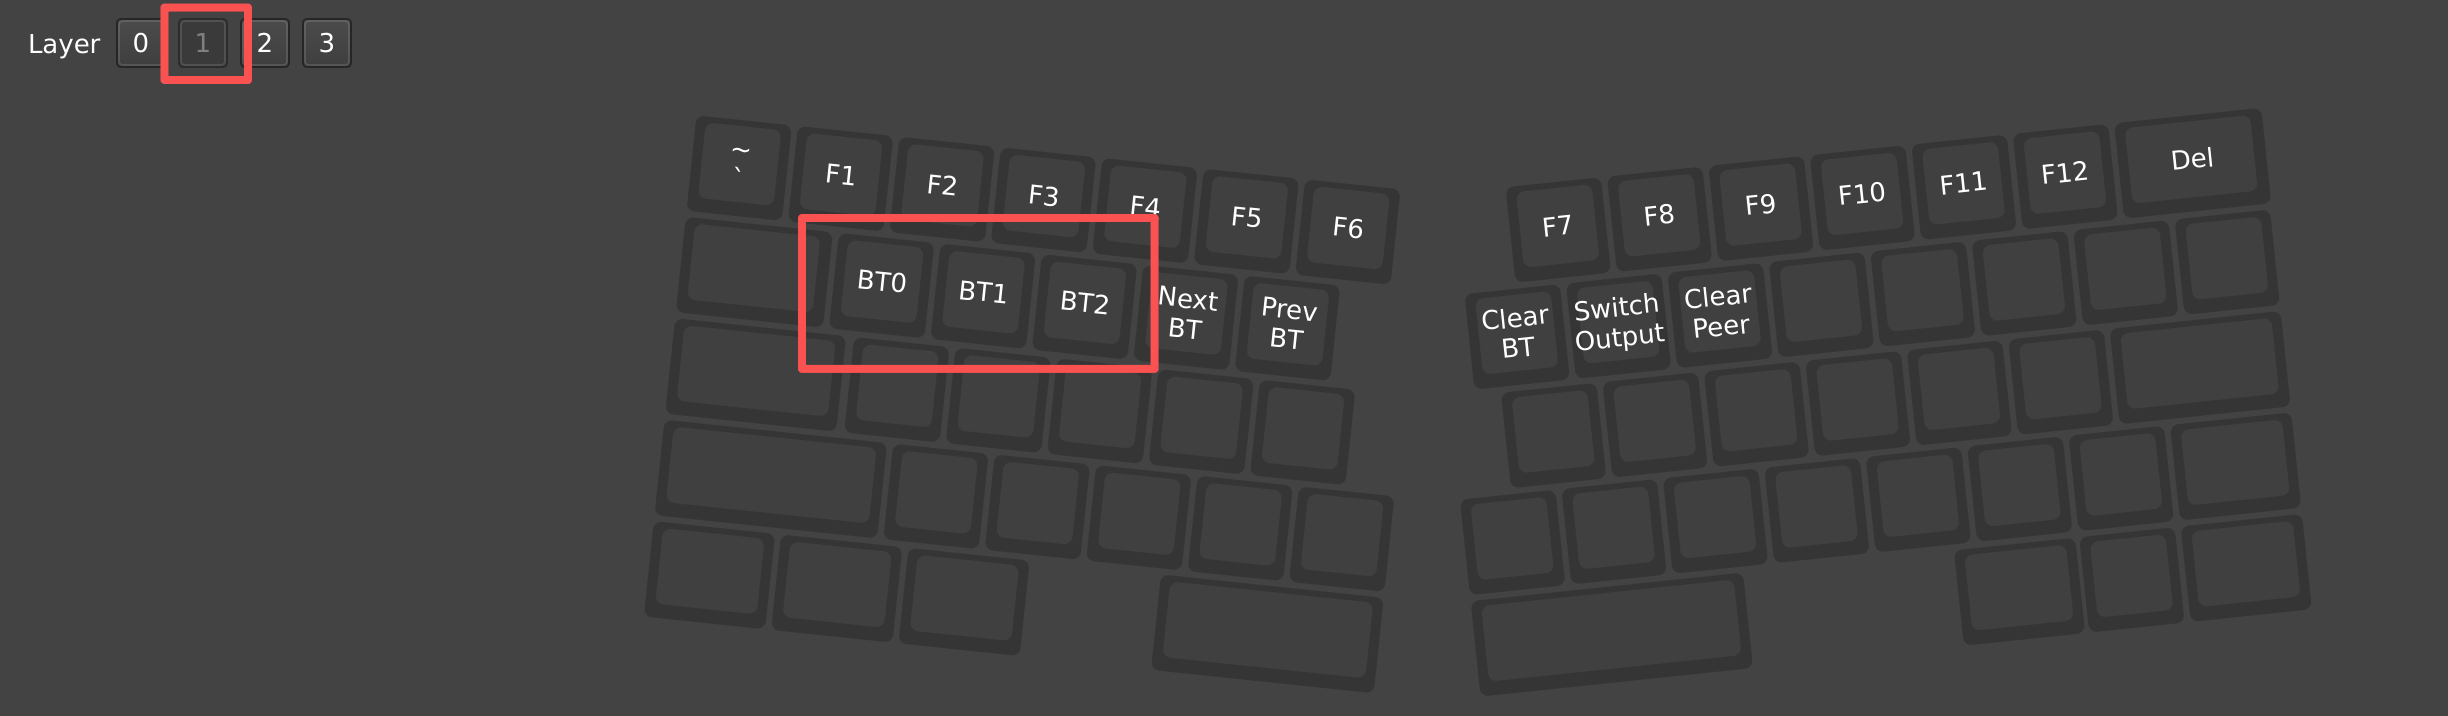
Toggling output modes. By default Elytra uses USB Priority. You can map a Switch Output
key in Vial's User tab to force Bluetooth Priority.
- USB Priority (default):
- USB plugged in → keyboard communicates via USB.
- USB unplugged → automatically switches to Bluetooth.
- Bluetooth Priority:
- Bluetooth is always the primary connection.
- Even when plugged in, the cable only charges the battery; keystrokes are sent via Bluetooth.
Using the Tenting Kit
Sold separately
The tenting kit is an optional add-on and is not included with the keyboard.
The CNC-machined aluminum tenting kit is designed for maximum ergonomics. By elevating the center of the keyboard it promotes a more natural hand position, significantly reducing wrist strain and pronation.
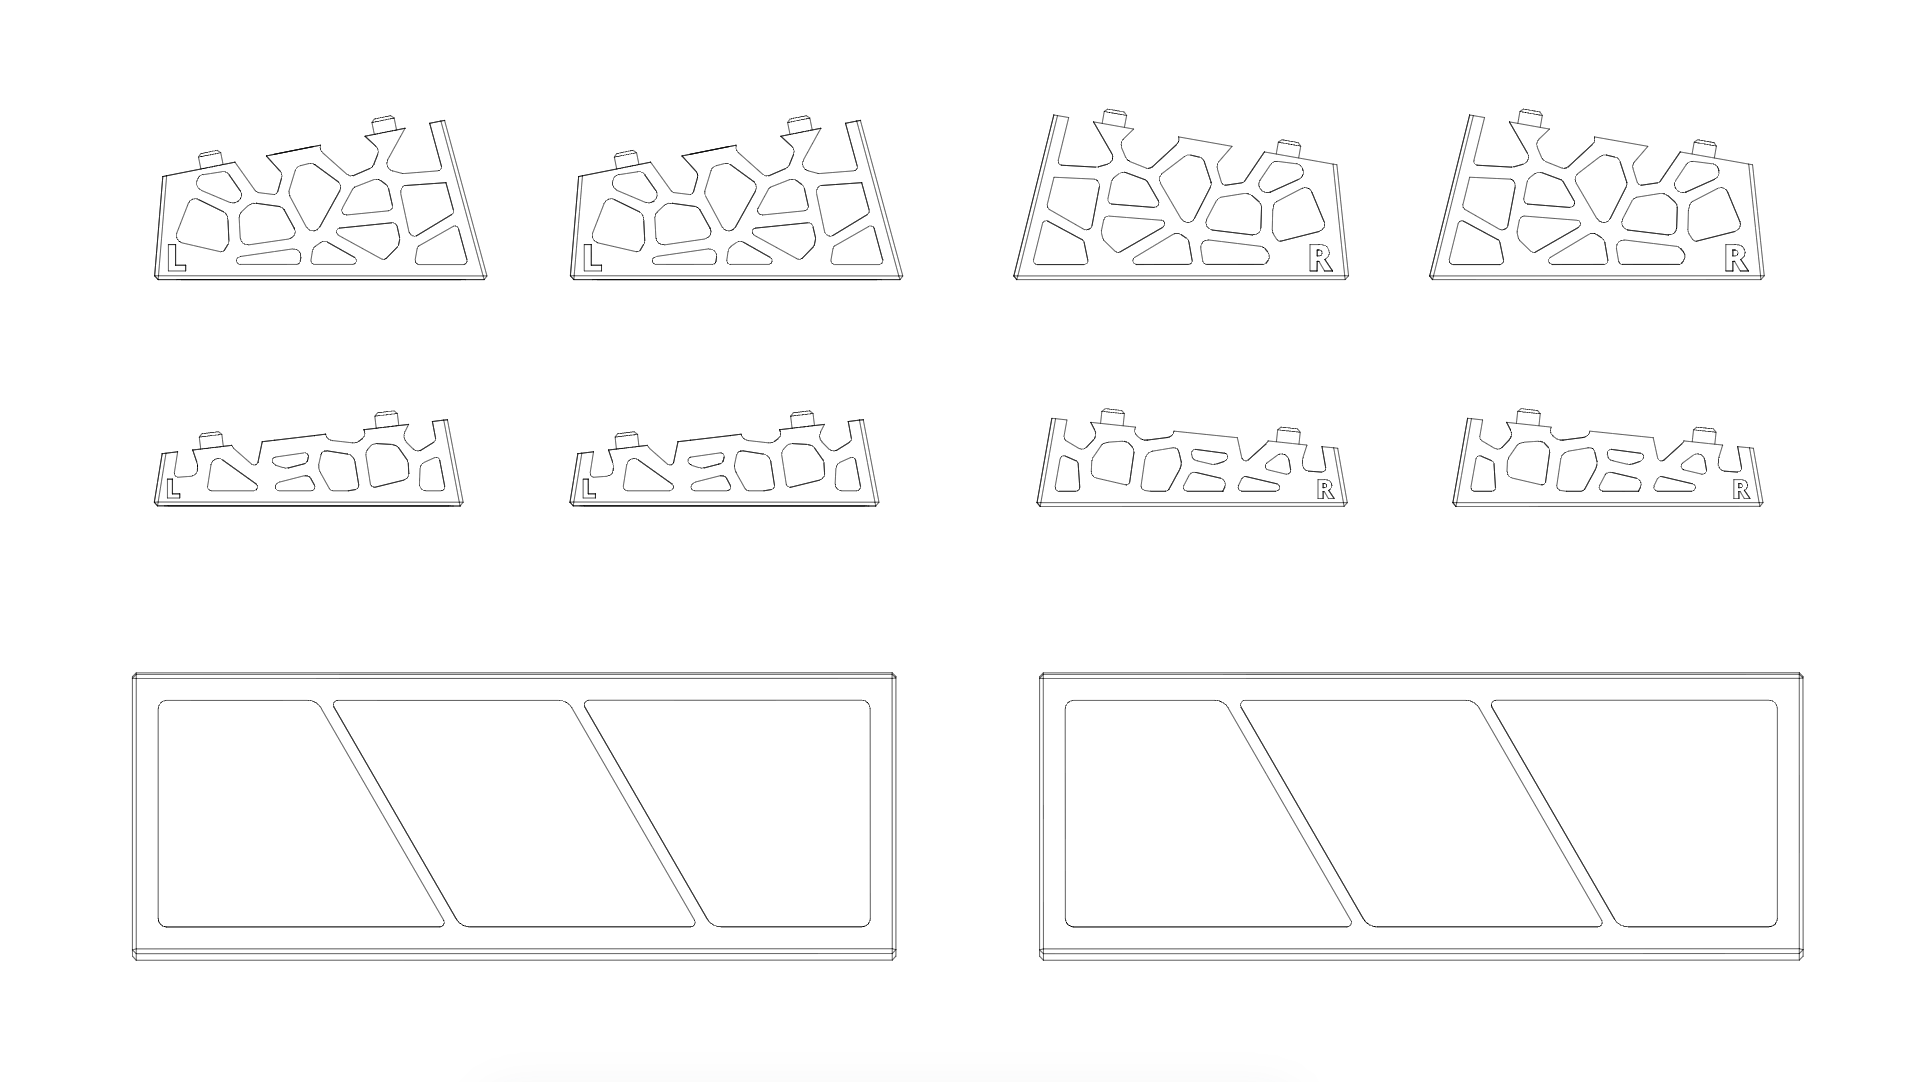
Components. The kit includes support plates (the base for the keyboard) and magnetic side walls (to adjust the height). The side walls offer two angles (6° and 10°), with specific pieces for the left and right sides. If you purchased the wrist rest kit, you'll have 4 side walls per side.
Assembly instructions:
-
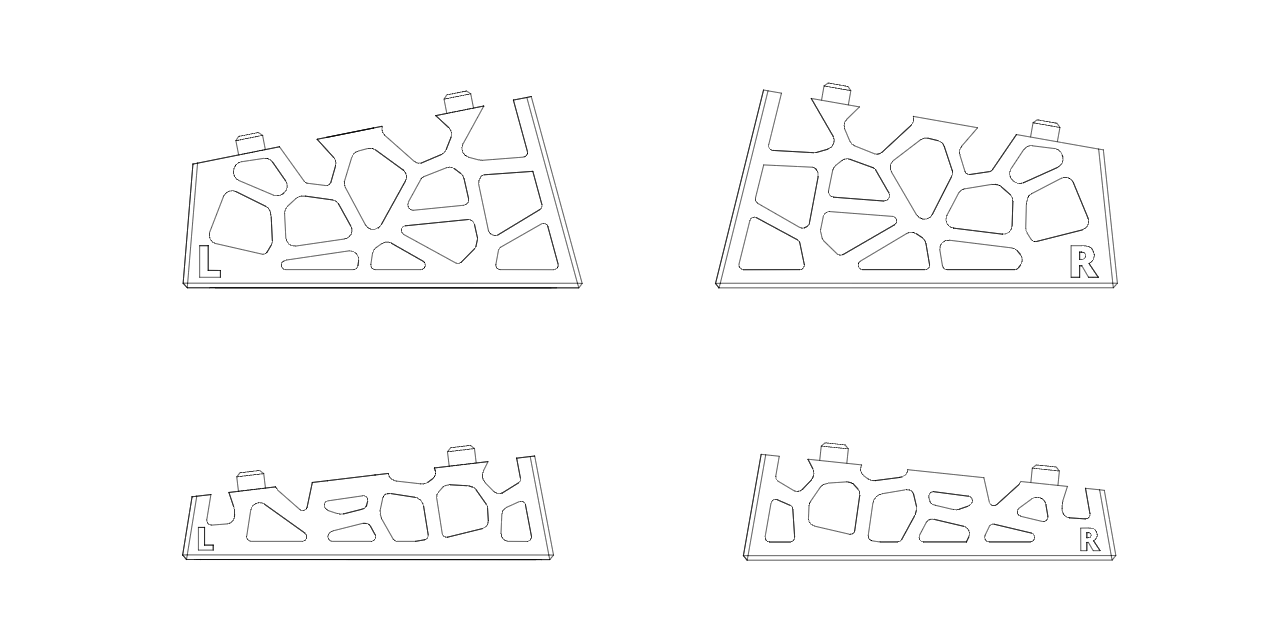
Choose your angle. Select your preferred incline (6° or 10°) and attach the corresponding side walls to the support plate. They snap into place magnetically.
Side walls are marked L (Left) and R (Right). The support plates themselves are universal and can be used on either side.
-
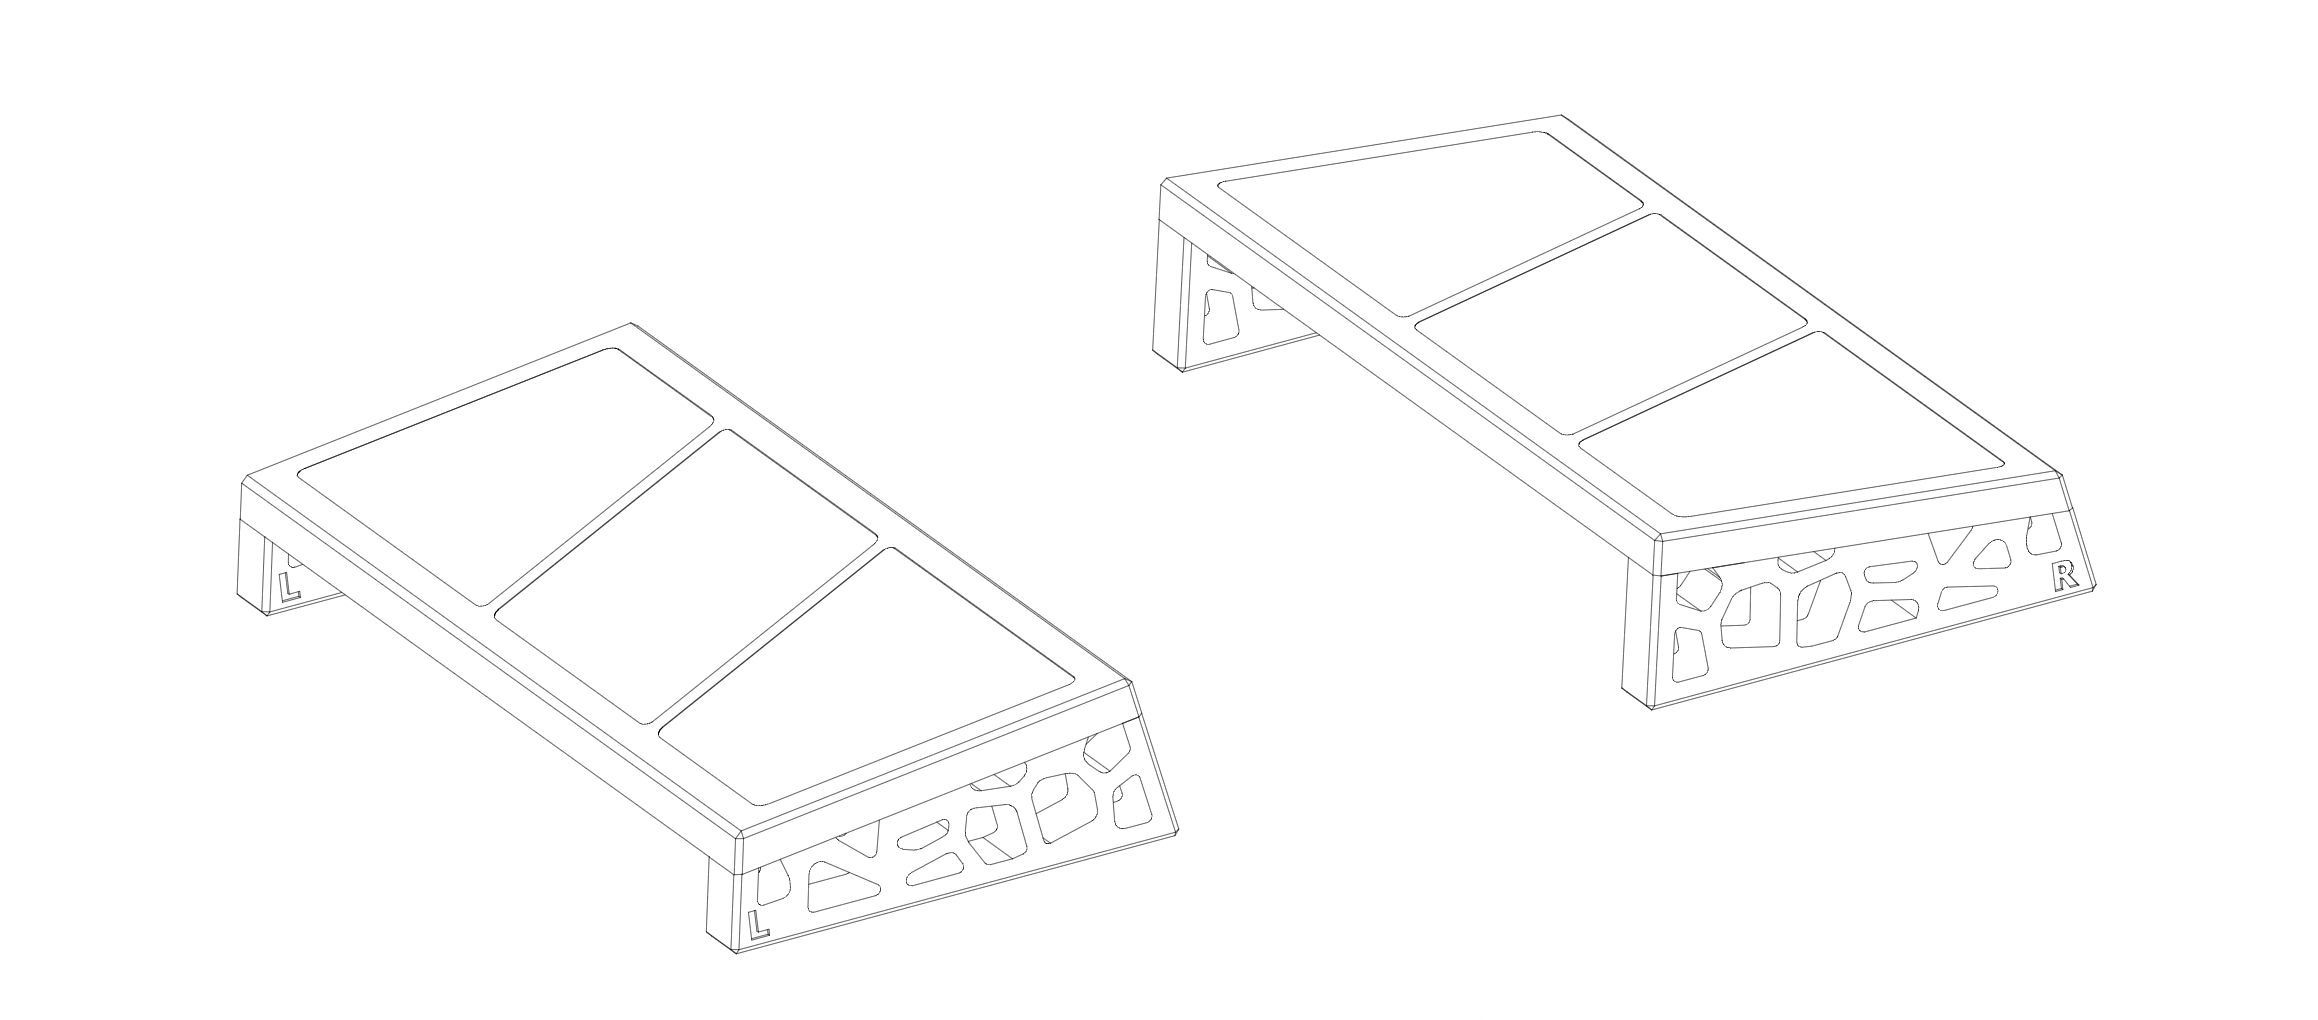
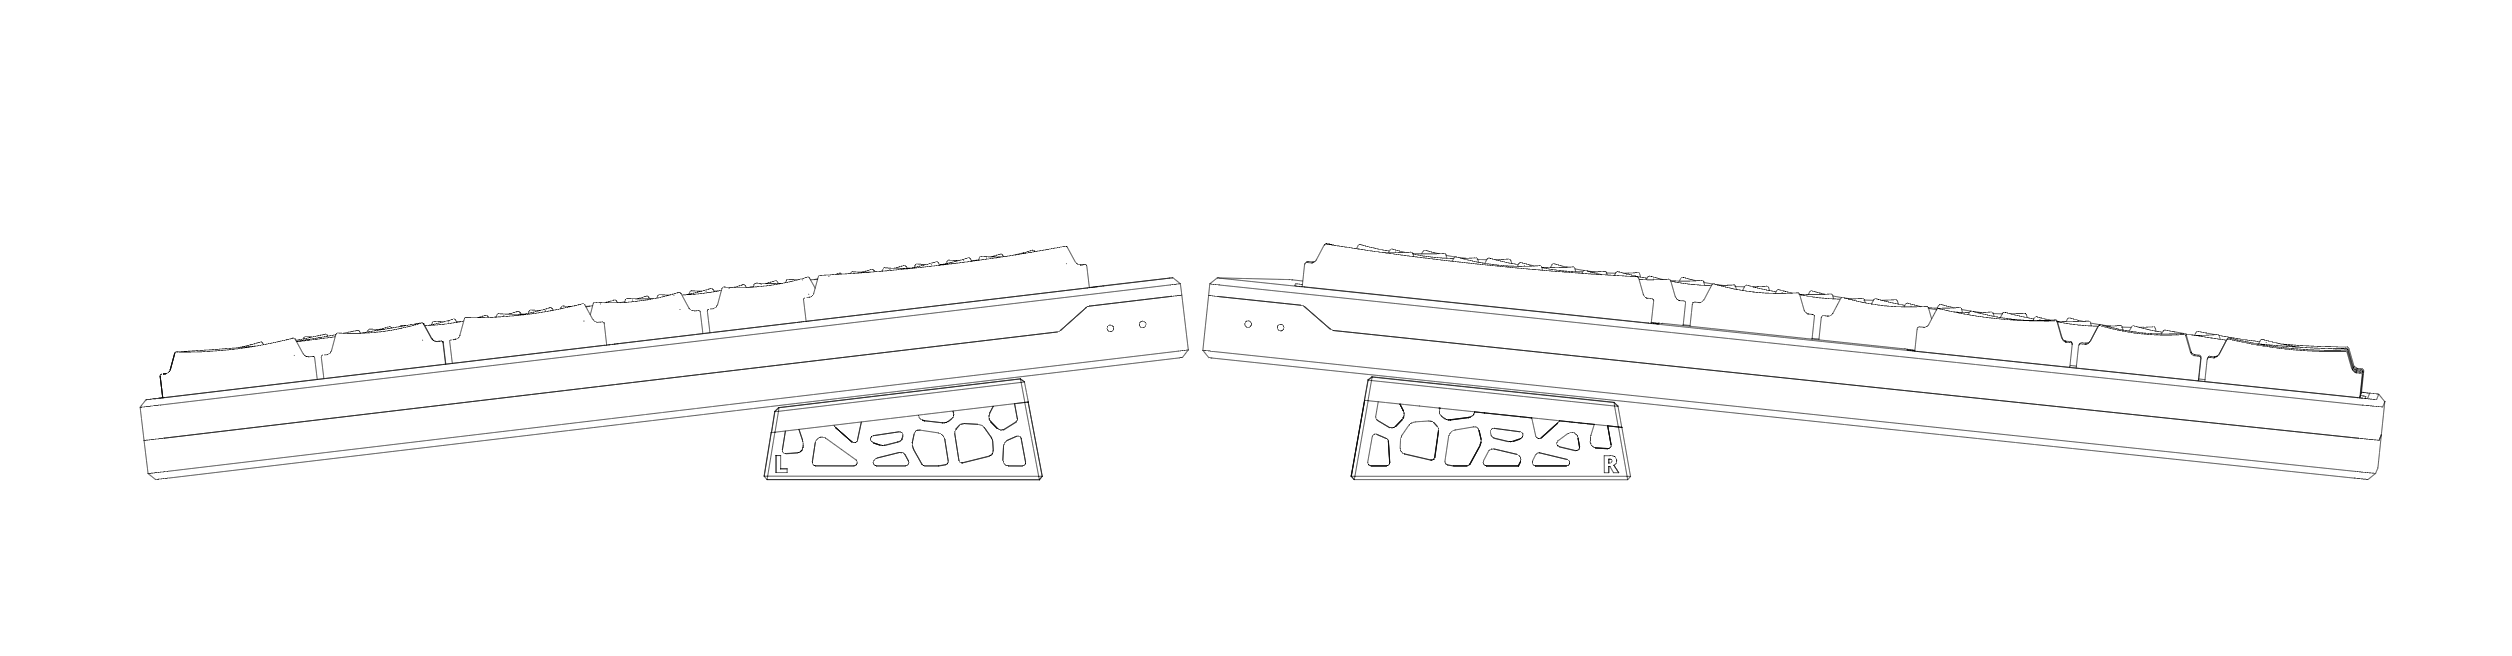
Mount the keyboard. Place the assembled tenting stands on your desk with the elevated sides facing inward (toward each other). Set the keyboard halves directly onto the plates — left half on the L stand, right half on the R stand — until they sit flush.
-
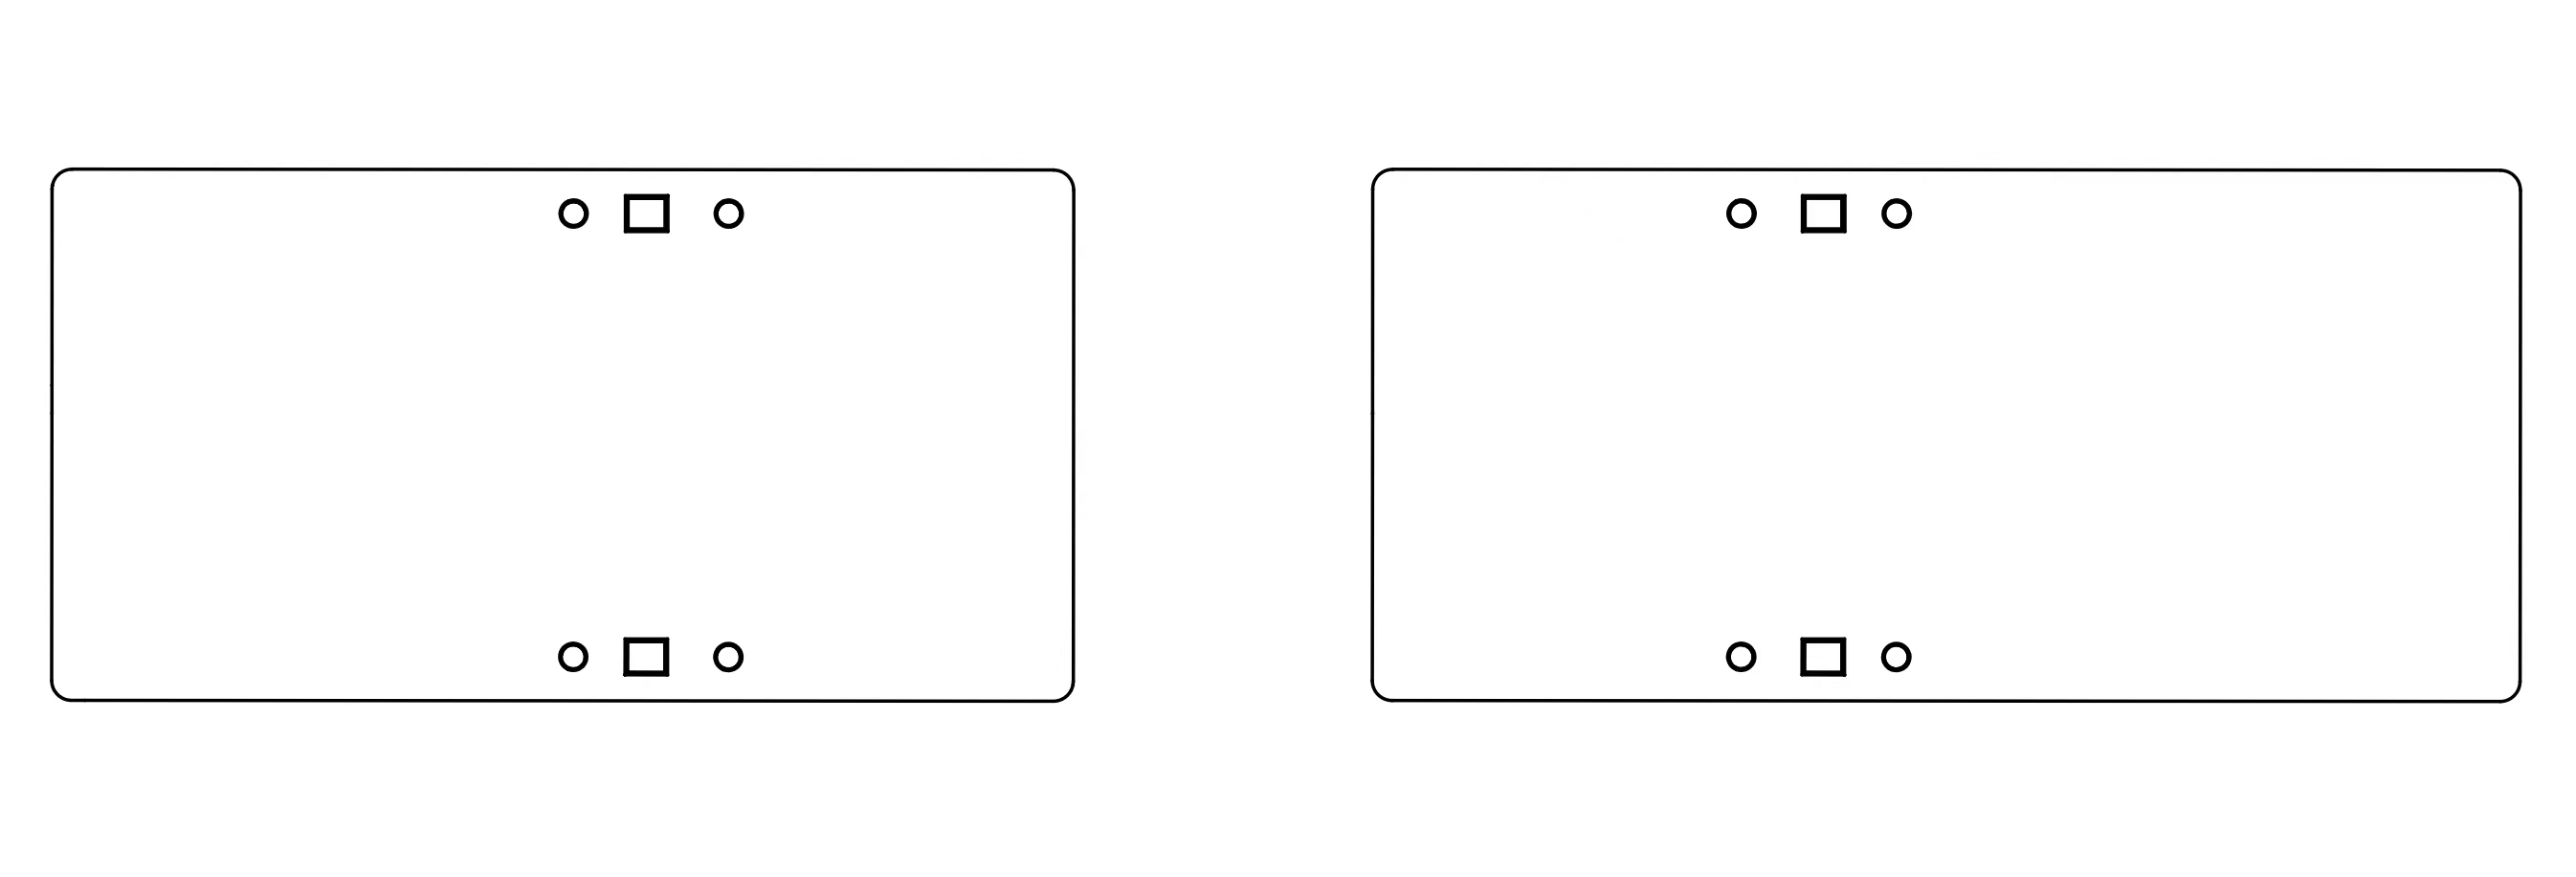
Attach the wrist rests (optional). If you purchased the wrist rest kit, the rests feature matching magnetic mounting points. Align them with the side walls to snap them into place.
Part 3: Firmware Update & Troubleshooting
Firmware Update Guide
To ensure optimal performance and stability, follow this standard UF2 process when updating your firmware.
Back up your keymap before you start. Flashing firmware restores the default keymap — any
custom keys, layers and configuration you set in Vial will be
erased. Open Vial first and click Save current layout to export your keymap to a .vil file.
After flashing, use Load saved layout to import that file and restore all your customizations.
Critical: The firmware files for the left (Central) and right (Peripheral) halves are completely different. Make sure you flash the correct file to the correct half.
-
Clear existing pairings. Remove "Elytra" from the Bluetooth device list on your computer or phone.
-
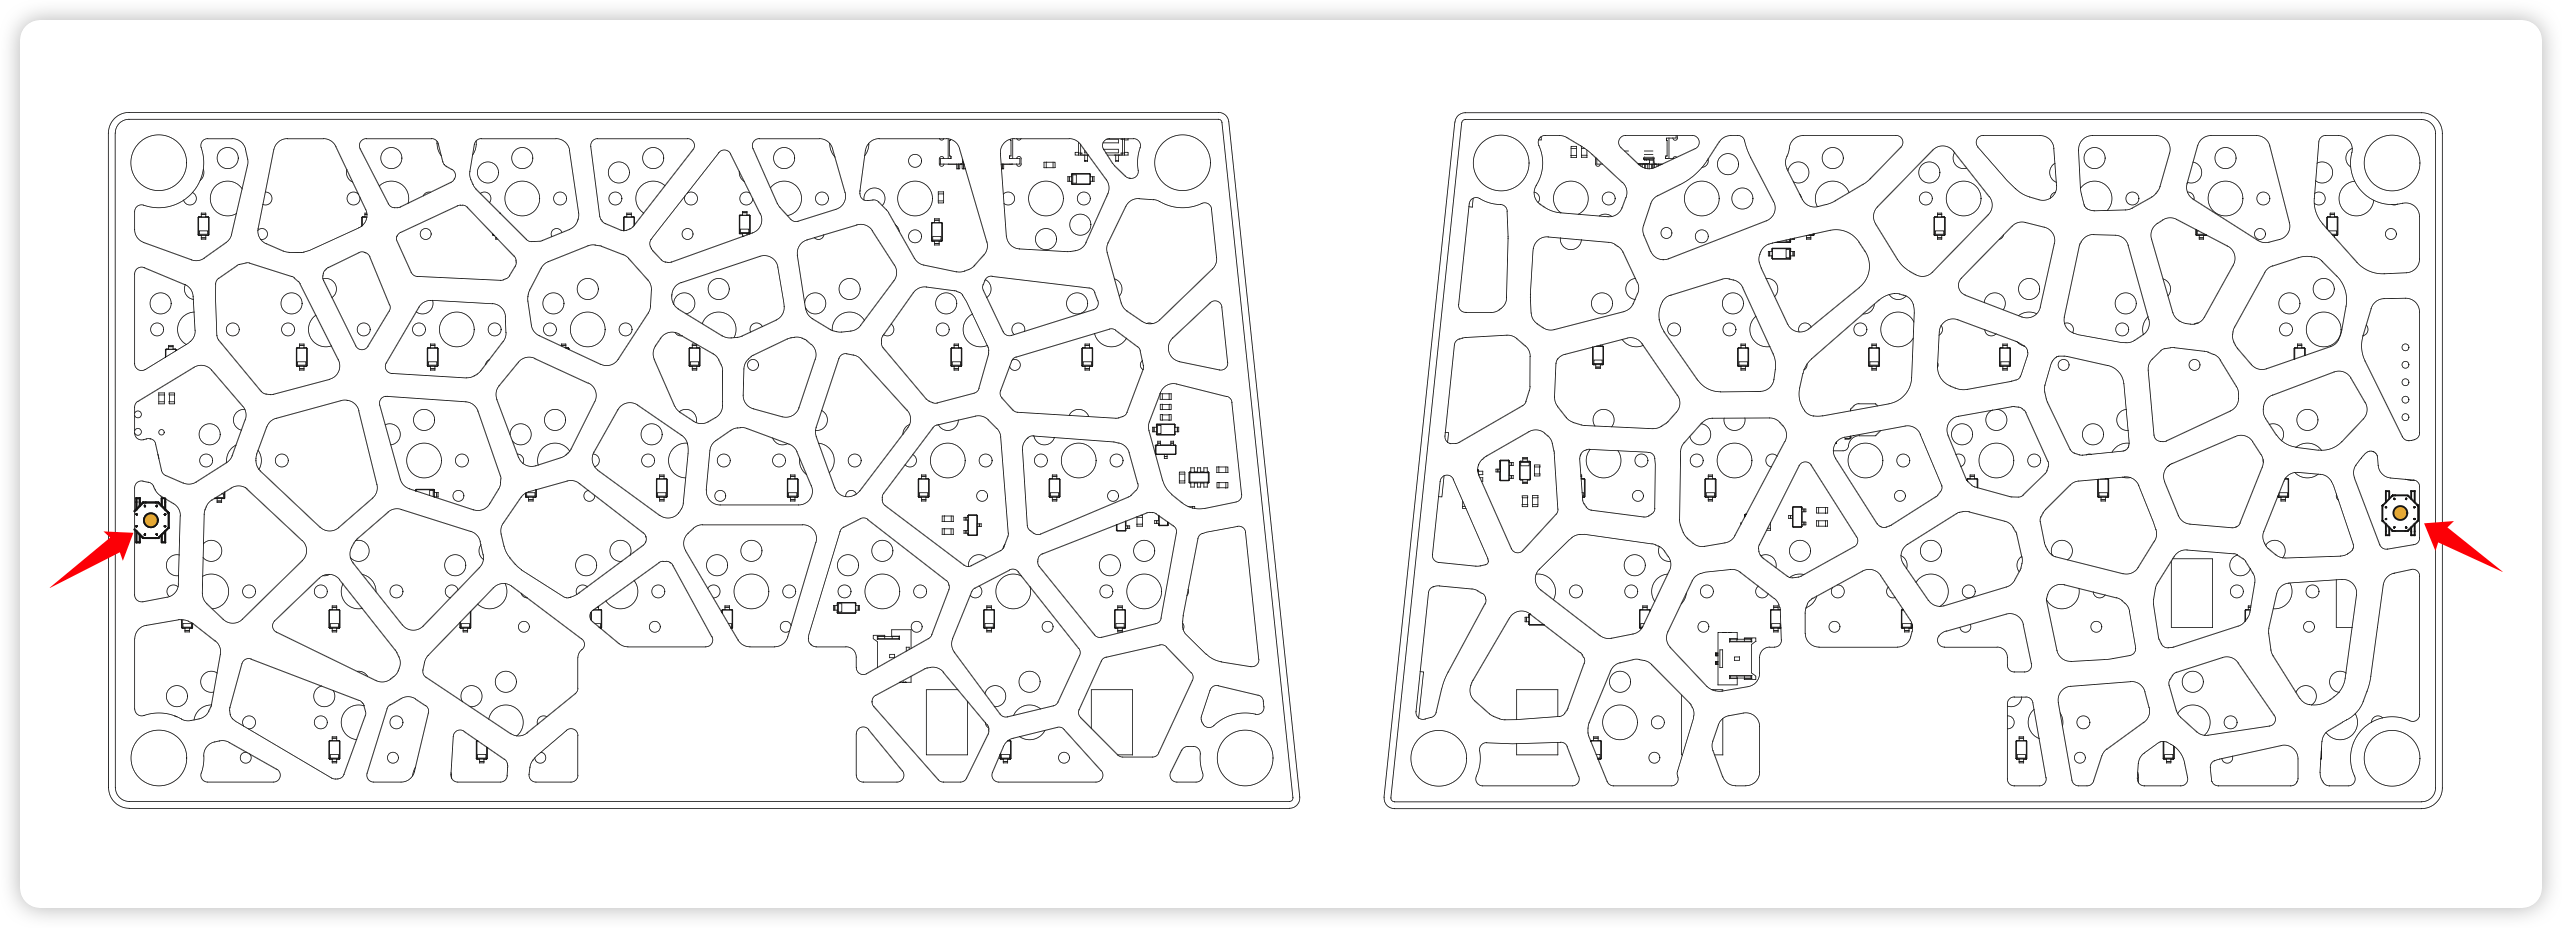
Connect the right half (Peripheral). Plug the right half into your computer with the USB-C data cable. Locate the reset button on the bottom edge and double-click it to enter update mode.
-
A flash drive named "Elytra" appears, containing three files:
CURRENT.UF2,INDEX.HTM, andINFO_UF2.TXT.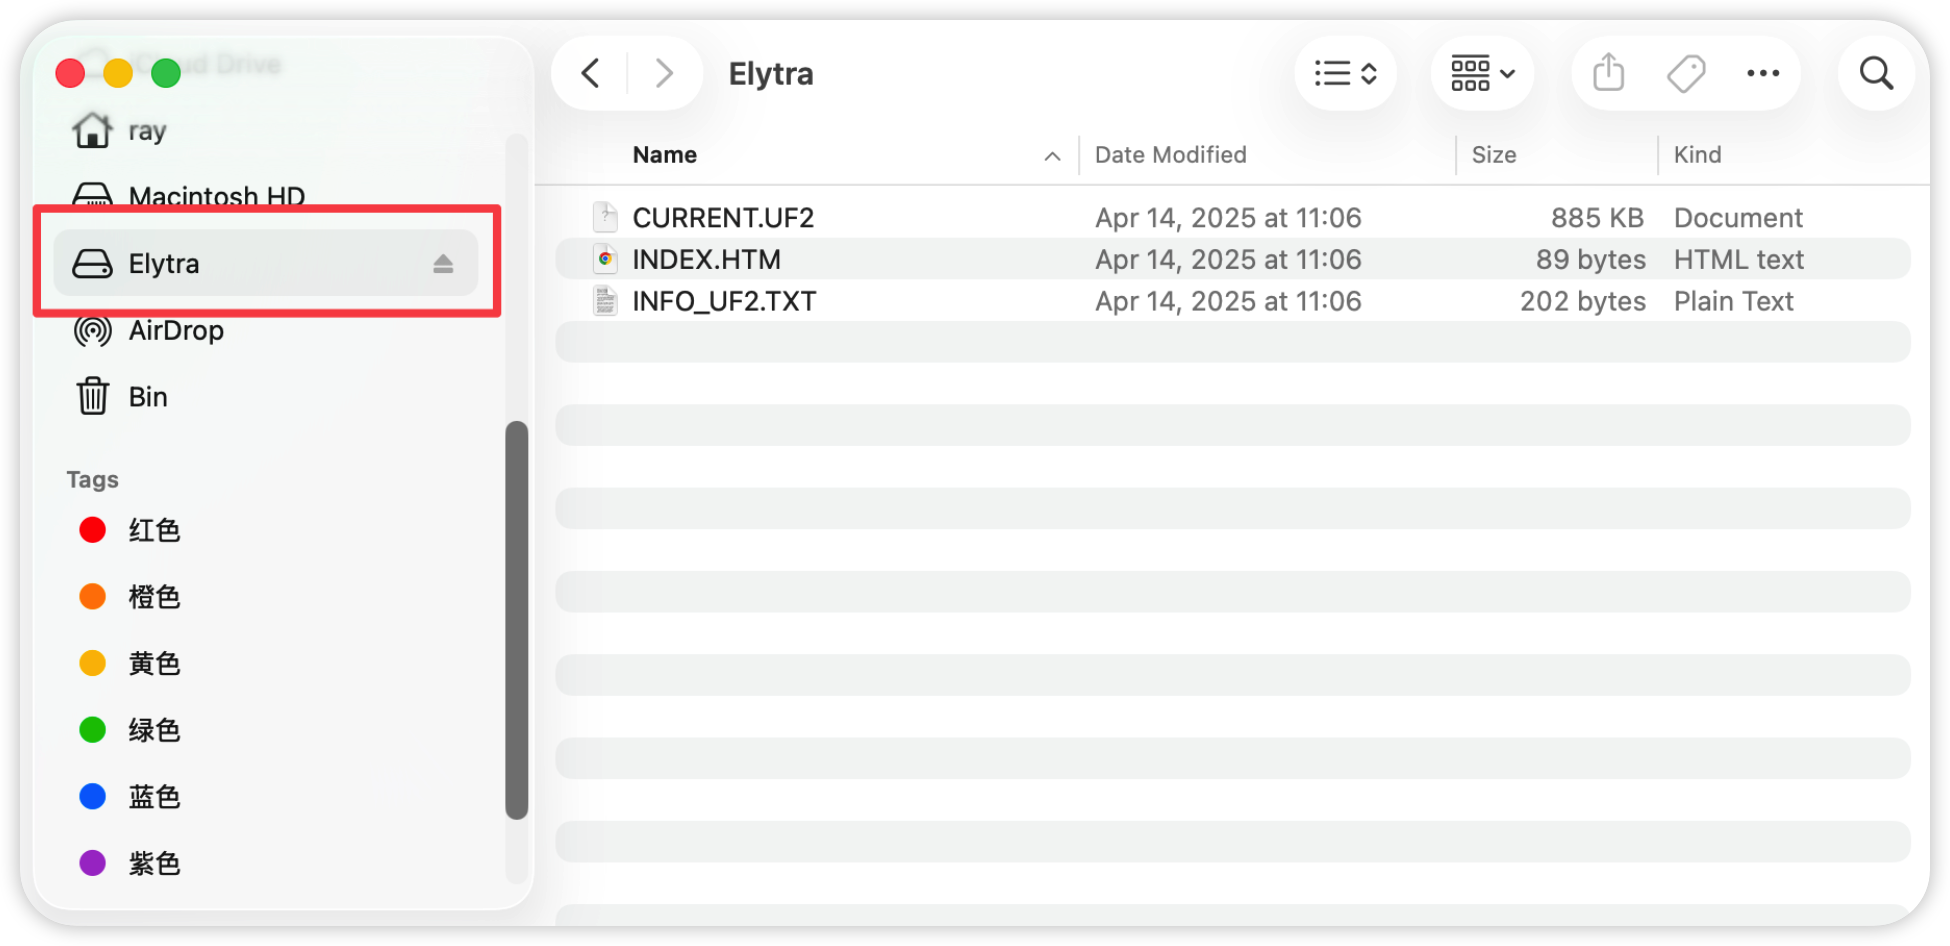
-
Flash the right half. Copy
elytra-peripheral.uf2onto the "Elytra" drive.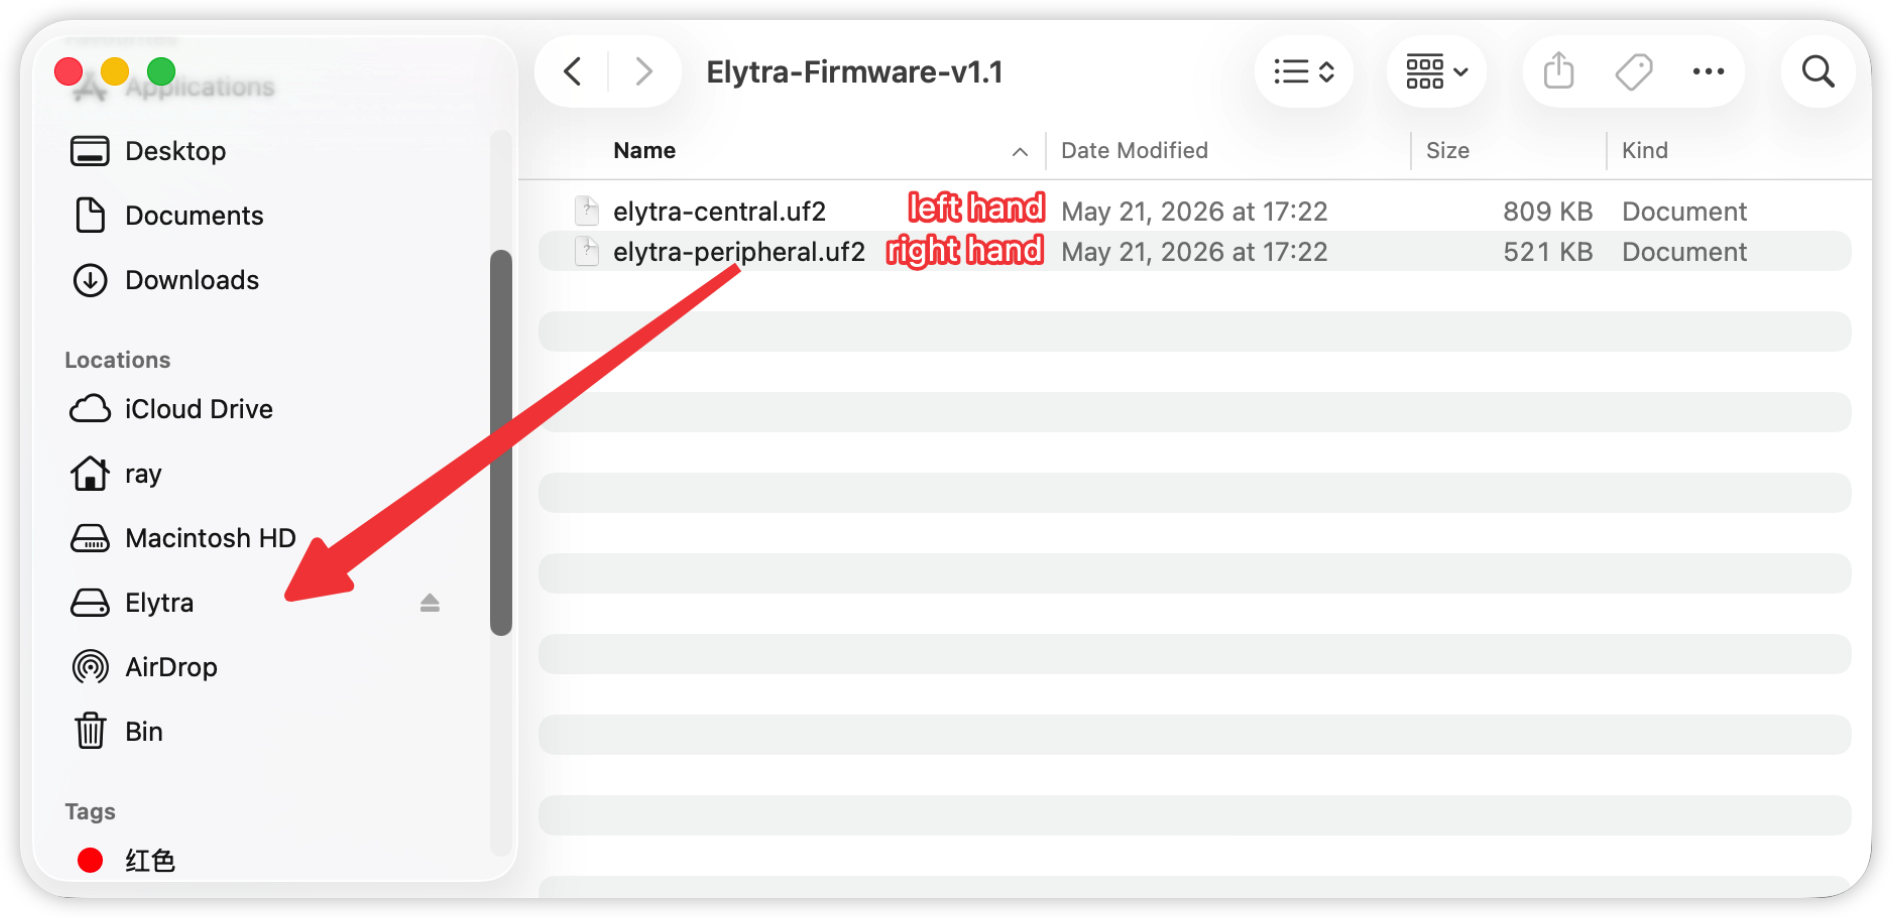
The drive disconnecting on its own is normal — it means the flash succeeded. The instant the file finishes copying, the device reboots to apply the new firmware, so the "Elytra" drive ejects itself. Your OS may warn you about this — on macOS, a "Disk Not Ejected Properly" notification (Error -36); on Linux, a write, I/O or "device disconnected" error in your file manager (e.g. GNOME Files / Nautilus). This is expected, not a failure.
You don't need to manually eject the drive or wait a fixed amount of time — once the "Elytra" drive disappears, the firmware has been written. The half reboots and is ready within a few seconds, after which it's safe to unplug the cable and continue.
-
Flash the left half (Central). Unplug the right half and connect the cable to the left half. Double-click the reset button, but this time copy
elytra-central.uf2.
Recovery tip: If you accidentally flash the wrong firmware, don't worry. Double-click the reset button again and copy the correct firmware file to overwrite the mistake.
Left & Right Re-pairing
If the two halves lose their connection to each other (indicated by a continuous, slow-flashing blue light on the right half), reset their pairing using the Clear Peer function:
-
Connect the left half to your computer, open Vial, go to the User tab, and temporarily map an easily accessible left-hand key to the
Clear Peerfunction.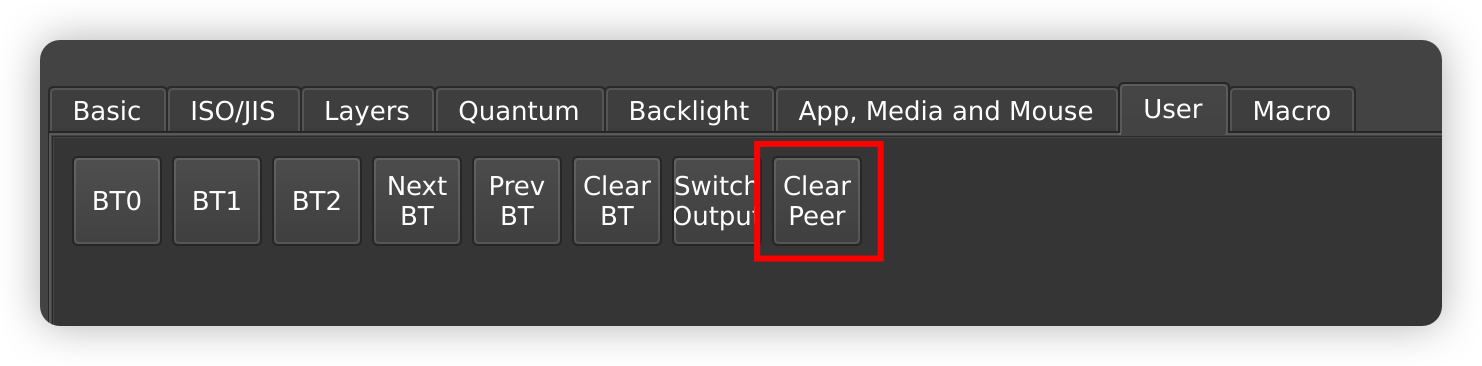
-
Press and hold the mapped key for 8 seconds.
-
Unplug the USB cable, turn off the power switches on both halves, wait 3 seconds, then turn them back on. Both halves show a breathing blue light and automatically re-bind to each other.
If you're pairing multiple sets of keyboards, power on only one pair at a time to prevent cross-connection between different splits.
Insulation Pad Replacement
The keyboard ships with a hollow insulation pad installed by default (matching the shape of the bottom case), and a full (solid) insulation pad is included in the box. To swap it out:
-
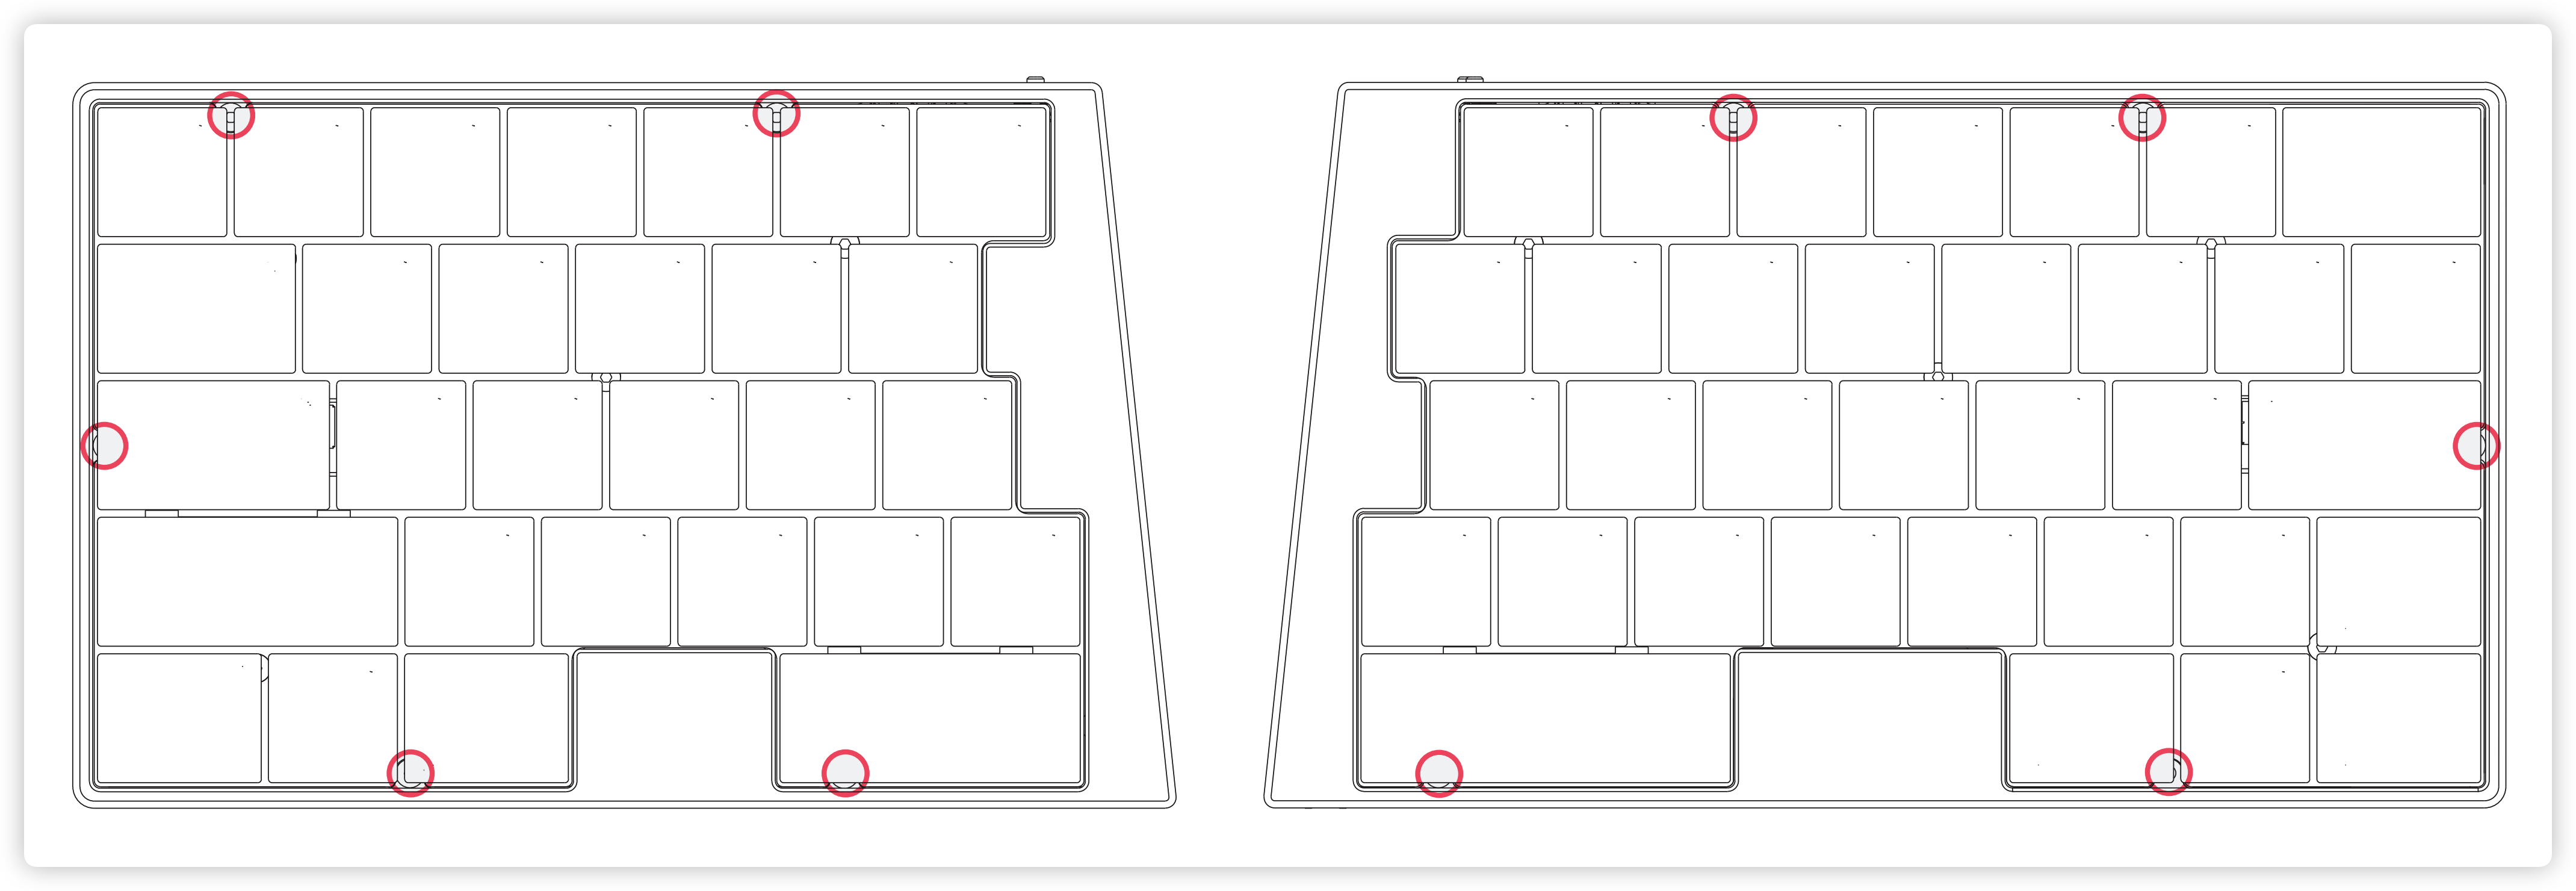
Pull off all the keycaps, then unscrew the screws at the positions shown below.
-
Separate the top case from the bottom case.
-
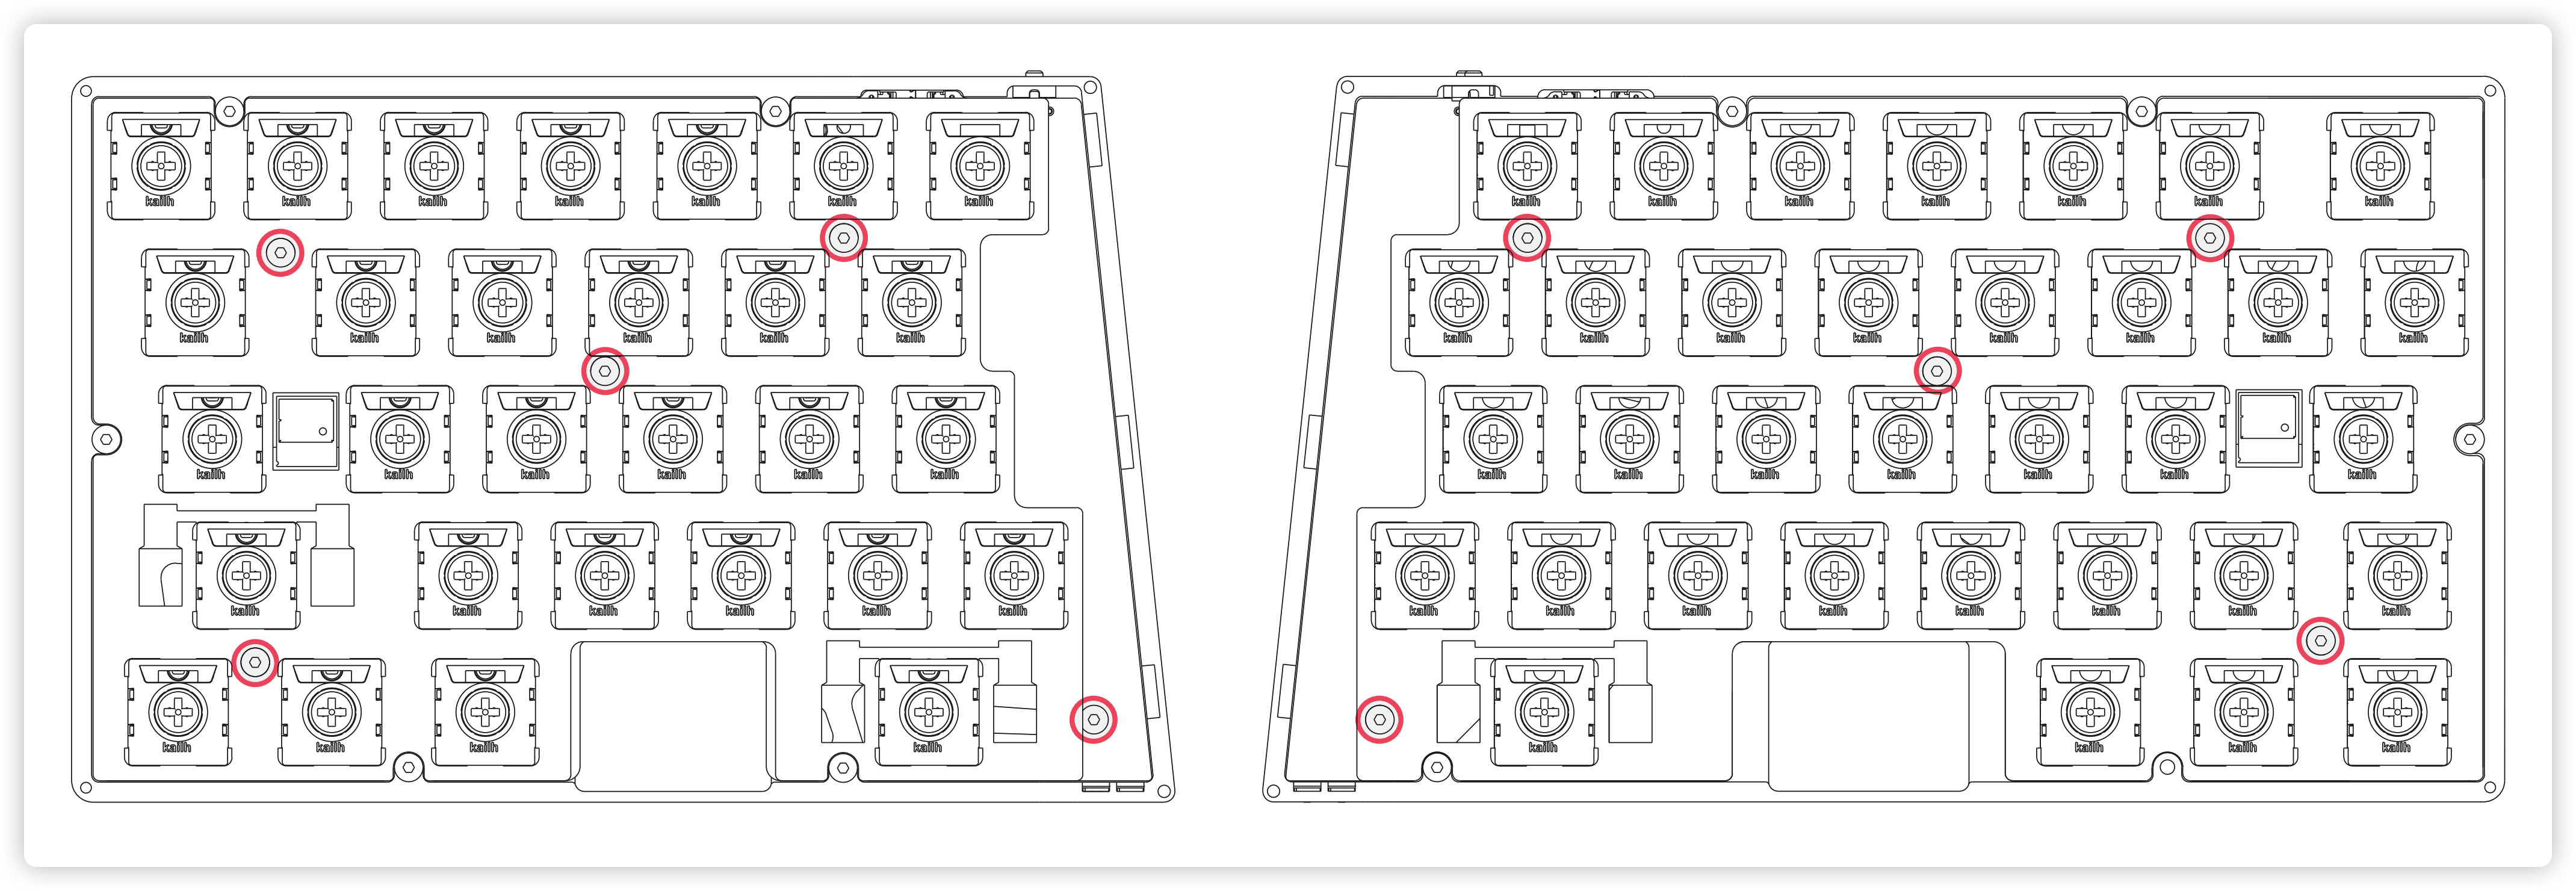
Unscrew the screws at the positions shown below.
-
Take out the inner assembly and replace the insulation pad.
-
Reassemble the inner assembly and the top case, then refit the keycaps and screws.
Frequently Asked Questions
Q: The keyboard isn't responding when plugged in, and Vial can't find it. Why?
A: Make sure your USB cable is connected directly to the left keyboard half. The USB-C port on the right half is wired strictly for charging and cannot transmit data.
Q: My computer can't find the keyboard via Bluetooth, or it won't pair. What should I do?
A: Connection issues are most often caused by outdated Bluetooth drivers. We strongly recommend visiting your network adapter manufacturer's website and updating to the latest version. For Intel adapters in particular, updating to the latest stable driver (24.10.00 or newer) typically resolves this immediately — see the Intel Bluetooth driver download.
Q: I'm experiencing frequent Bluetooth disconnects or severe key latency.
A: Check for physical obstructions (metal monitor stands, thick desks) between your computer's Bluetooth antenna and the keyboard. Adjust the position of your PC/antenna to keep a clear line of sight to the left (Central) half, as well as between the central and peripheral halves.
Q: I have a problem that isn't listed here.
A: We're always happy to help. Reach out to support@elimkeys.com with details about your issue and we'll get back to you as soon as possible.
Part 4: Firmware Download
V1.4
Changelog
- Improved: Significantly longer battery life for the left (Central) half — roughly 3–4x longer than before.
- Fixed: Laggy typing after waking from sleep.
- Added: Support for BT keys in macros.
- Added: Support for PDF keys in macros.
Download
- Elytra Firmware v1.4
- Checksum: sha256:35665b2a2f54ccc92c173e2af30f794eceae0185395b67c8b7b0f5054c45baf6
V1.3
Changelog
- Changed: Increased the maximum number of combos to 16.
- Fixed: BLE output stopping when the keyboard is powered through a charge-only USB connection.
Download
- Elytra Firmware v1.3
- Checksum: sha256:96043c4b736ec22c96ed4fddf59bcd2227d91b3fd404e621786b00b8d1ab250f
V1.2
Changelog
- Fixed: Improved Bluetooth compatibility.
- Fixed: Unexpectedly long connection time between the central and peripheral halves.
- Added: Support for the PDF key in Vial.
Download
- Elytra Firmware v1.2
- Checksum: sha256:58b25a77b1a0438f20be38618e3240160727384319d5b57d20715aec06498dca
V1.1
Changelog
- Fixed: General stability issues.
- Improved: The BLE connection now remains active when plugging in a USB cable, enabling seamless switching between USB and BLE devices.
Download
- Elytra Firmware v1.1
- Checksum: sha256:9d05d1cd231dc23ca9c922d49ed099286e2d466239fc16cff11696034b308b95
V1.0
Changelog
- Initial release.
Download
- Elytra Firmware v1.0
- Checksum: sha256:3d2599f8e1f4ad88a4305ebc5ac4798dd42ad7e7276538defae60f1af8878be9